Inspecting and Testing Desktop Element in Nexial Interactive
Introduction
Starting from Nexial v3.7, Nexial Interactive supports the inspection and testing of desktop components. Such capabilities can greatly expedite the script creation of desktop applications, as well as improving the learning process of desktop automaton. One can use these capabilities to verify that:
- A desktop element is accurately mapped to a XPATH.
- A desktop element is properly “autoscanned”, and the corresponding label is mapped.
- A desktop element is clickable or “double-clickable”.
- A desktop element can receive text input, including shortcut key(s).
- The application menu of an desktop window contains a series of menu and sub-menu items.
- The context menu (i.e. right-click) of a desktop element, along with a series of its sub-menu items can be triggered.
Getting started
To start utilizing the Inspect desktop element feature:
- Start Nexial Interactive. Click here for instruction.
- Once Nexial Interactive is started, one can perform some desktop automations to bring the target
application to the desired state (for e.g., open a certain window or form) if necessary. Note that if one wishes to
inspect desktop elements via the autoscan labels, the
appropriate desktop »
useApp(appId)and desktop »useForm(formForm)must be invoked prior to Inspect. - When the desired state of the target application is reached, start the “Inspect” mode in Nexial Interactive by
entering
Iori. - One should see a short description about Inspect, like this:
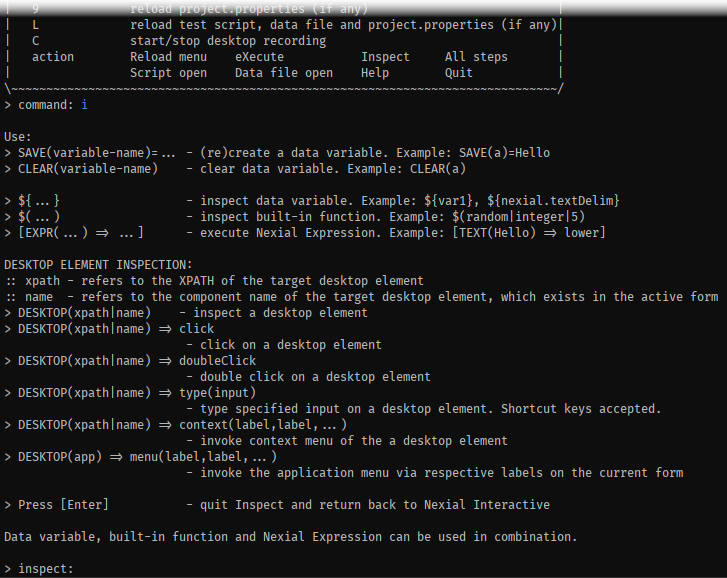
- Now we are ready to try out desktop inspection
Inspect Desktop Element(s)
To inspect a desktop element, use the DESKTOP(locator|name) syntax. A desktop element can be referenced by its
XPATH (hint: use UISpy to formulate the appropriate XPATH), or by its component
name (derived during autoscanning).
Suppose we want to inspect the component property of a Notepad application:
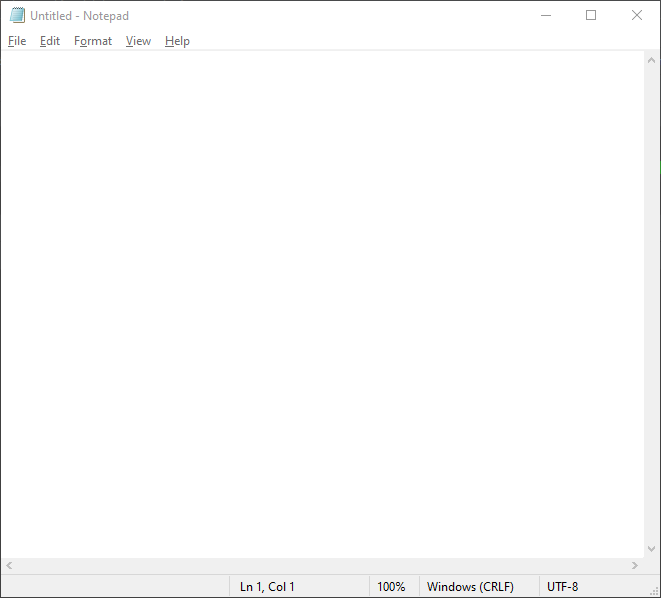
Using UISpy, we can derive the following XPATH for the editor area of Notepad:
/*[@ClassName="Notepad"]/*[@ControlType="ControlType.Document"]
We can inspect such component using this XPATH, and the result would look something like this:
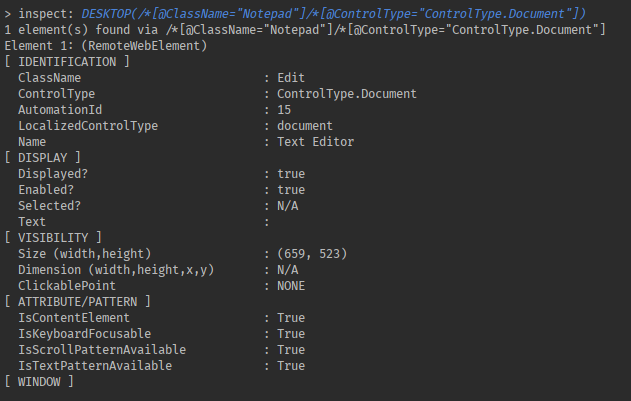
The inspection result can differ based on the target desktop element. Some desktop elements such as a Window can expose some information about its dimension, while simpler/embedded elements like a radio button might not. The Inspect feature in Nexial Interactive will adjust its output accordingly to the target desktop element.
Using this feature allows one to verify the accuracy of the XPATH against the intended element, as well as some insights
into the interaction possibility for a desktop element. For example, if a desktop element should render True for
IsTextPatternAvailable, this is a good indication that such element can receive text input (i.e. keyboard input).
Testing Desktop Element(s)
One can also use this Inspect feature to perform some simple automation against a desktop element. This can be a great way to verify the expected behavior of a desktop element, as well as discover the interaction possibility with a desktop element.
As of now, here are the possible automation that can be performed from Inspect:
-
DESKTOP(xpath|name) => click- to click on a desktop element, possibly to invoke a click event or to focus on an element. -
DESKTOP(xpath|name) => doubleClick- to double click on a desktop element. -
DESKTOP(xpath|name) => type(input)- to enter text (i.e. keyboard input) on a desktop element. Shortcuts are supported here. -
DESKTOP(xpath|name) => context(label,label,...)- to activate the context menu (i.e. right-click) on a desktop element. To trigger submenu, specify the successive list of menu items separated by commas. Alternatively one can also trigger the context menu via the position of the menu item. For example,context(INDEX:5,2)means trigger the 5th item of the context menu, follow by the 2nd item of the submenu. -
DESKTOP(xpath|name) => menu(label,label,...)- to active the application menu (from menu bar). Note that the target element, expressed either as XPATH or component name, should point to the application window (the parent component of the MenuBar component).
Below is an example of automating the context menu on Windows Explorer (Windows 10).
For brevity, we will save this XPATH to the Windows Explorer (opened to Desktop) a variable:
SAVE(explorer)=/*[@ClassName="CabinetWClass"]/*[@ClassName="ShellTabWindowClass"]/*[@ClassName="DUIViewWndClassName"]/*[@ClassName="DUIListView"]/*[@ClassName="UIItemsView"]
To activate the context menu on the right side of the Windows Explorer (which shows Desktop), we can use the
context(...) syntax, like this:
DESKTOP(${explorer}) => context(Group by,Name)
Note that each “level” of the context menu is separated by a comma (,), and that the exact menu label should be
specified here.
The result of this automation can be seen below:
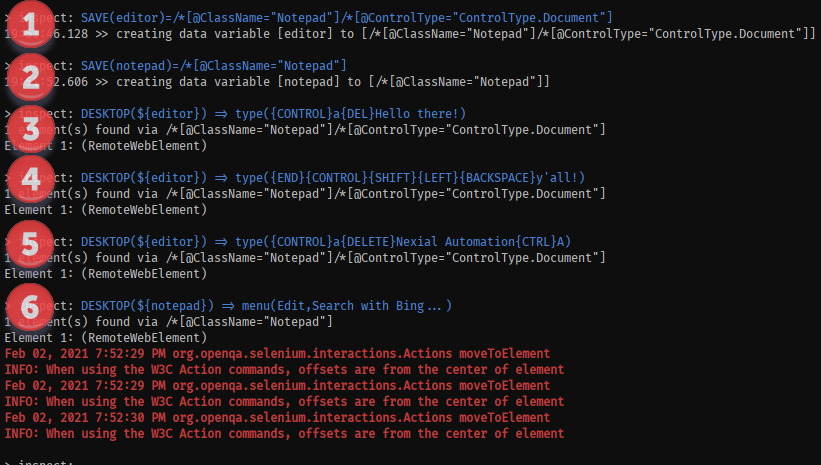
Below is another example - this time, automating on Notepad.
Suppose we want to type some text on Notepad, modify the text and then invoke the application menu. Here are our steps:
- To reduce typing, let’s save the XPATH of the editor area in Notepad as a variable
editor:
SAVE(editor)=/*[@ClassName="Notepad"]/*[@ControlType="ControlType.Document"] - Also, save another variable for the Notepad window:
SAVE(notepad)=/*[@ClassName="Notepad"] - Now select all the text in Notepad (
CTRL-A), delete them (DELETE) and then type inHello there!):
DESKTOP(${editor}) => type({CONTROL}a{DEL}Hello there!) - Next, move the cursor to the end of the line, use
CONTROL-SHIFT-leftto select the last word. Remove the last word usingBACKSPACEand then type iny'all!:
DESKTOP(${editor}) => type({END}{CONTROL}{SHIFT}{LEFT}{BACKSPACE}y'all!) - Next, select all the text and replace it with
Nexial Automation:
DESKTOP(${editor}) => type({CONTROL}a{DELETE}Nexial Automation{CTRL}A) - Last, invoke the application menu (Edit -> Search with Bing):
DESKTOP(${notepad}) => menu(Edit,Search with Bing...)
Notice that we can mix text and shortcuts here. Click on the link below to learn more.
Function and Control Key Mapping
Nexial's key mapping supports all common PC-104 and Mac keyboard keys. Modifiers and function keys are enclosed within{...}(see below). Regular keys can be expressed as is.Modifiers
(may be use in combination, such as{CONTROL}{ALT}F)
{SHIFT}-
{CONTROL},{CTRL} {ALT}-
{WINDOWS},{WIN}(PC-104 keyboard only) -
{COMMAND},{META}(Mac keyboard only)
Function keys
-
{F1}through{F12} -
{ESCAPE},{ESC} -
{BACKSPACE},{BKSP} {INSERT}-
{DELETE},{DEL} {TAB}{SPACE}{ENTER}
Directional keys
{HOME}{END}{PAGEUP}{PAGEDOWN}{UP}{DOWN}{LEFT}{RIGHT}
Legacy desktop application support
The key mapping described above should suffice for most desktop application as well as modern browser. However,
there are some older applications where these key mapping might not yield the desired effect. Older, or
legacy, applications tend to use "ASCII-based" key mapping instead of the
newer
Unicode PUA (Private Use Area) code points (which, incidentally, is what Selenium is based on).
In order to properly simulate key presses on legacy applications, or applications that only support
ASCII-based key mapping, one would enable such feature via the System variable
nexial.desktop.useAsciiKey by
setting it to true. The default for this System variable is false.
Here’s the result of such automation:
Feedback
We love to hear your feedback! Give it a try and let us know what you think!