Database Automation
Introduction
Just to be clear: automation may or may not be related to testing. Certainly test automation is greatly desired due to its myriad of benefits. But automation can include tasks that provides no intrinsic value towards product quality or test coverage. Depending on how the script is set up, Nexial can be used for just automation or for test automation.
Nexial provides a set of capabilities that interact with target database to extract, manipulate and validate its data. Speaking of database, we are referring only to RDBMS. Support for other types of database will be discussed separately.
Section 1: Setup
First thing we need to do is to set up a profile for each database connectivity we need. Essentially profile is how
one sets up database connectivity in Nexial. To do that, we would add connection details in data file, like this:
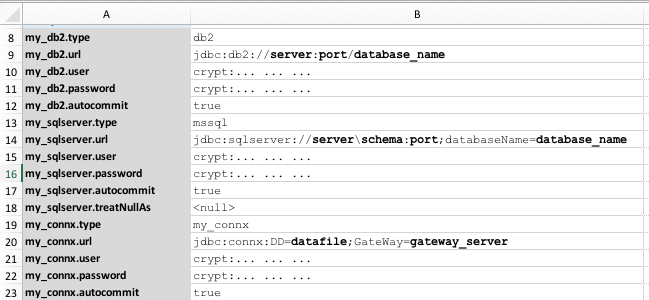
Here, we have 3 distinct database profiles specified:
qapay01ngpdbisam
You can differentiate them by how these profile names are used as prefix to a set of data variables. This is the approach in Nexial to create complex data grouping, where an arbitrary “prefix” groups a series of configuration together. In this case, a database connection profile consists a set of data variables with the same ‘prefix’:
[PROFILE].type       = connx|db2|isam|mysql|oracle|postgresql|sqlite|sqlserver
[PROFILE].url        = jdbc:... ...
[PROFILE].user       = ...
[PROFILE].password   = ...
[PROFILE].automcommit= ...
[PROFILE].treatNullAs= ...
Check out rdbms for more details. We can add support for more database upon request.
Note the following:
- Only
.type,.url,.user, and.passwordare REQUIRED. .urlshould represent the JDBC connection string specific to each database vendor. Please check vendor documentation for more details.- As of now,
connxandisamare synonymous. The underlying JDBC connectivity to “isam” is implemented through the Connx JDBC driver, which is a JDBC Type 3 driver. If you wish to connect to ISAM database, please obtain JDBC driver from Connx and place it under/libdirectory. We might support other ISAM JDBC drivers in the future. - You can create as many profiles as needed, but make sure the profile names are unique and contains no dot (
.). - As a convenience, it might be best to put all these profiles in the
#defaultdata sheet so that they can reuse for any test scenario.
Let’s do a quick run to verify that the profile is set up correctly. Here’s the script that simply executes a query to
retrieve the server’s current time:

The corresponding data file looks as follows:
| data sheet | content |
|---|---|
| #default | 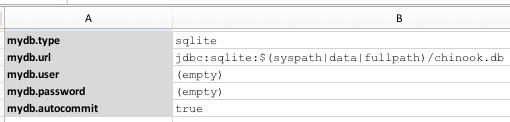 |
| HelloWorld |  |
The referenced sqlite db is located in the data directory.
Here’s the output:
nexial.[sh|cmd] -script $PROJECT_HOME/artifact/script/rdbms-01.xlsx

We can see from the output that the SQL executed successfully (using profile mydb). Looking at the output, we can
see that the database connection is established, and the ${tell time} query executed successfully. The
base » verbose(text) command simply prints out the textual representation of the ${mydb result}. The last
line in the output is the resultset of this query:
data =[{RIGHT_NOW=2018-01-21 21:12:09}]
Great! Now let’s see what else we can do with database automation.