Nexial Interactive
Introduction
While we strive to create an intuitive and empowering platform for automation, Nexial might still seem challenging for the uninitiated. Those unfamiliar with automation or software testing, the idea of designing “steps” to “break” a software system might seem awkward at first. However, after a few tries, one could quickly grasp the core concept and gain momentum. As the saying goes, practice makes perfect. It is through repeated practices, in fact through failure, that one truly learns.
This is the initial impetus of Nexial Interactive. The idea is to provide an environment where one learns about Nexial and automation at a more consumable and effective pace. One can use Nexial Interactive to step through one or more commands repeatedly, each time with possibly different parametrization. The try-observe-repeat cycle through Nexial Interactive hopefully fosters a more engaging and intuitive way to:
- learn Nexial
- learn about automation
- learn about the target application (AUT)
- learn about an existing automation script/suite
Capabilities
Currently Nexial Interactive comes with the following capabilities:
- (re)assign and (re)load test script
- (re)assign and (re)load data file
- (re)assign test scenario
- (re)assign activities; may be out of designated sequence
- (re)assign steps; may be out of designated sequence
- Inspection
- execute the assigned activities or steps
- record current Interactive session
Note that the main objective of Nexial Interactive is to execute a subset of the automation script, perhaps repeatedly, so that we can better understand the target application, the automation objective, or the capability of Nexial. As such, Nexial Interactive does not support test plan or multiple scenarios. The common usage pattern is to focus on a block of steps (of one scenario, naturally), work through the “execute-observe-repeat” cycle, and move on to the next block of steps. One can assign or reassign the number of steps or scenario between execution.
Try it yourself
To activate Nexial Interactive, simply add the -interactive flag to your Nexial execution command line argument. If
needed, one may include -scenario ... and -data ... command line arguments as well.
-interactive
flag at the end:
cd C:
cd C:\projects\nexial-core\bin
nexial.cmd -script C:\projects\MyProject\artifact\script\MyTestScript1.xlsx -interactive
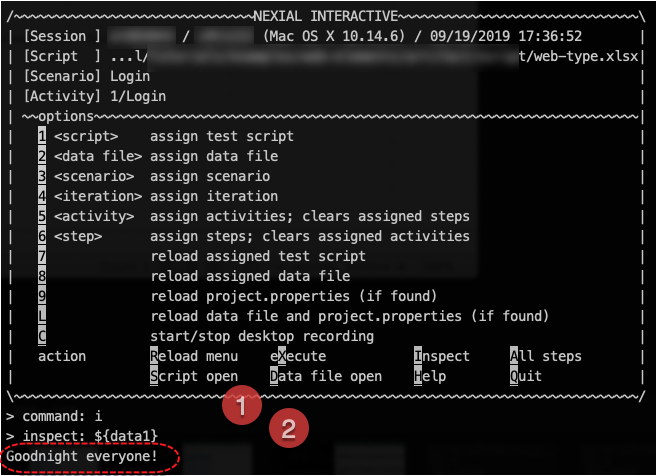
If all goes well, a console-based menu (see below) will appear.
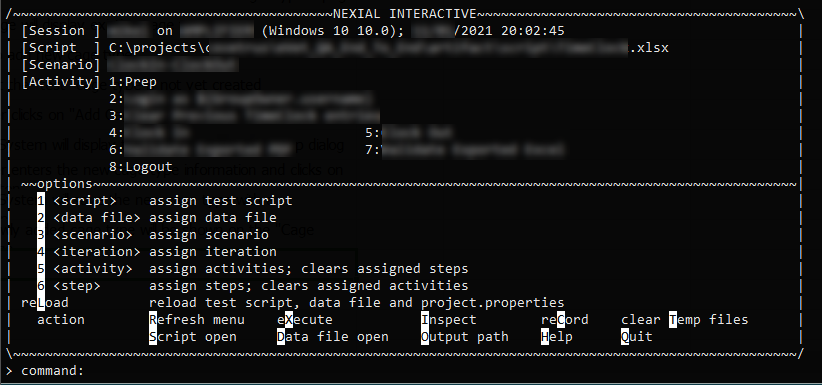
This represents an active Nexial Interactive session. The top half of the menu shows the current configuration: the
assigned script, the assigned scenario and the assigned activities/steps to
execute. The second half
are the available options and actions to control the current Nexial Interactive session - these options and actions are
represented by the characters highlighted with white background. They can be activated by typing the corresponding
letter or number at the “command:” prompt. Click one of the tabs below to see more details about these options and
actions.
Options and Actions
All option and action keys are NOT case-sensitive.
1assign test script2assign data file3assign scenario4assign iteration5assign activities6assign step(s)- re
Load script and data - re
Cord (desktop) Refresh menu- e
Xecute Inspect- clear
Temp files Script openData file openOutput pathHelpQuit
1 to assign another script in the current Nexial Interactive session.By doing so, one can execute another script - and by nature of that, another scenario - without restarting Nexial Interactive. This also means that the AUT (application under test) is also kept as is and not restarted. This can be very useful if one wishes to execute another script after having executed the script initially specified. One can think of this as a way to interrupt the intended execution flow, with the possibility of surfacing new automation routes or validations.
Here's how From the
command: prompt, enter 1 then
the fully qualified path of the new script. To see the changes, use R (or r) to
reload the Nexial Interactive menu. One will observe that the script file, scenario, and activity information
is updated to reflect the newly specified file. Below is a snapshot of assign another script in a Nexial
Interactive session: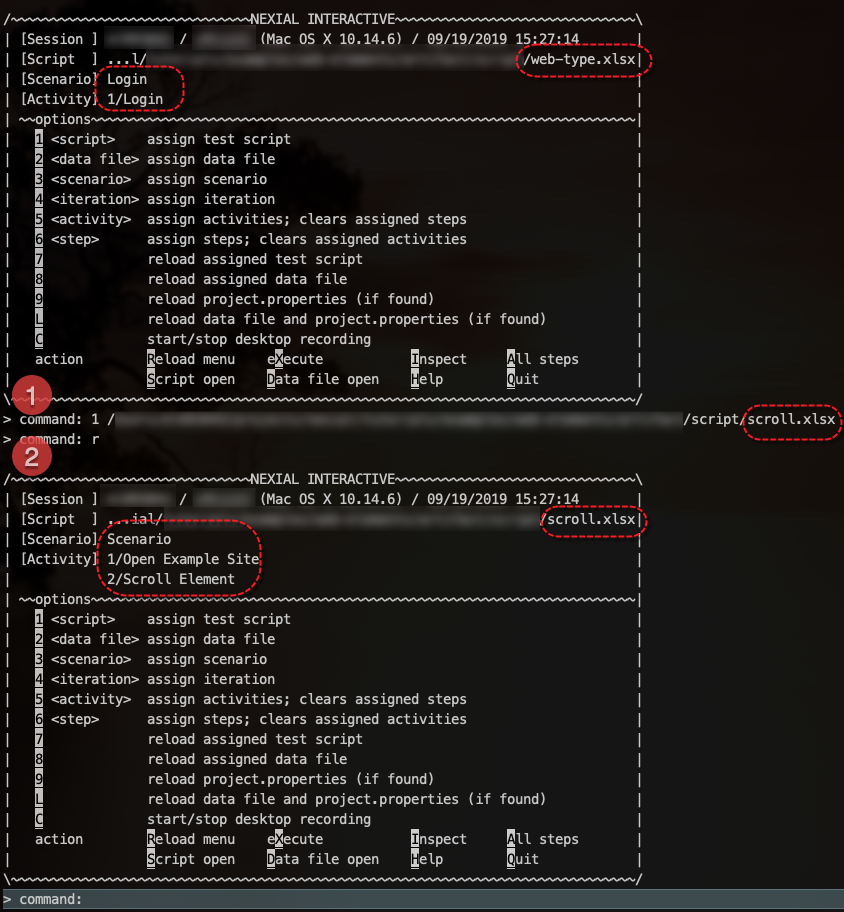
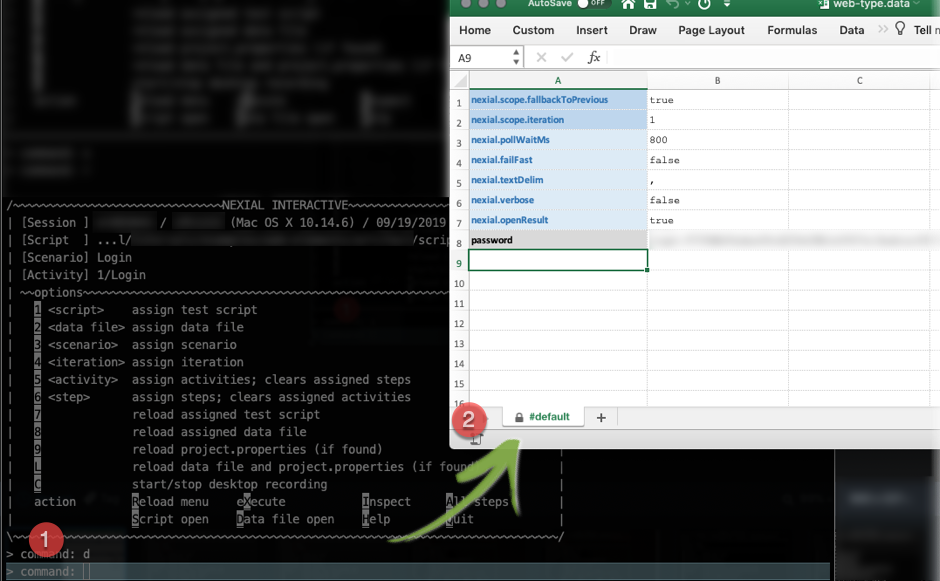
2 to assign another data file in the current Nexial Interactive session.By doing so, one can execute the same script with a data file that is different than what was initially specified or loaded by convention. This means one can run the same script with different data, and thus exercise possibly different test scenarios. One can also think of this as a form of data-driven exploratory testing.
Here's how From the
command: prompt, enter 2 then
the fully qualified path of the new data file. Use I (or i) to activate
Inspection
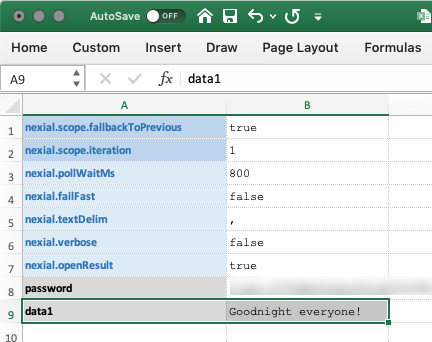
where one can see the newly loaded or changed data variables. Below is an example of this feature in action:Suppose this is the data file that is loaded initially:
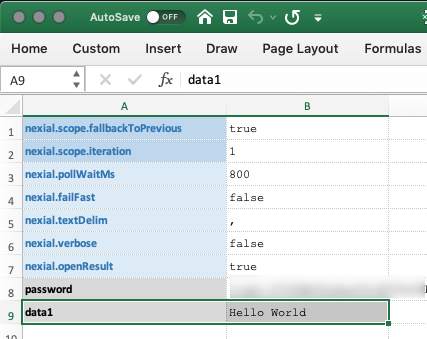
We can see that
data1 is correctly loaded via
Inspection: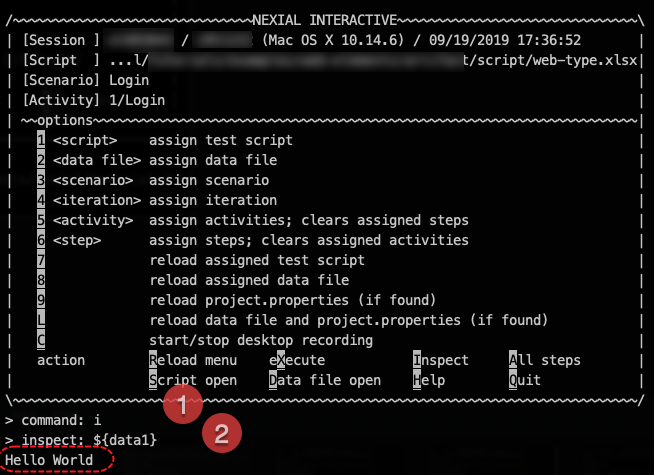
Now, suppose we have another data file which contains a different value for
data1:
To load it, we will use the Option
2 as follows: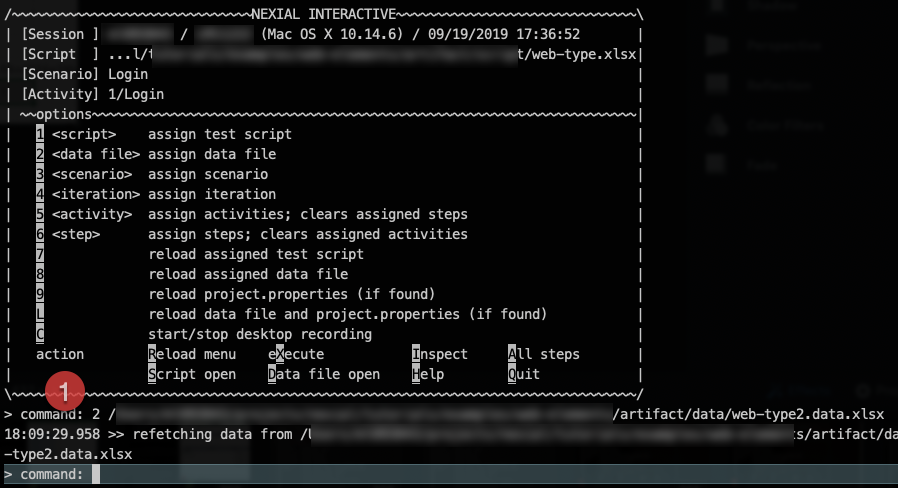
To see that the data file has been newly reassigned, and the corresponding data loaded correctly, we can re-activate Inspection again:
3 to assign another scenario of the current script in the current Nexial Interactive
session.By doing so, one can execute another scenario without restarting Nexial Interactive. This also means that the AUT (application under test) is also kept as is and not restarted. This can be very useful if one wishes to execute another scenario not previously considered. One can think of this as a way to interrupt the intended execution flow, with the possibility of surfacing new automation routes or validations.
Here's how From the
command: prompt, enter 3 then
the target scenario name of the assigned script. To see the changes, use R (or r)
to reload the Nexial Interactive menu. One will observe that the scenario and activity information is
updated to reflect the newly assigned scenario. Below is a snapshot of assign scenario in a Nexial
Interactive session: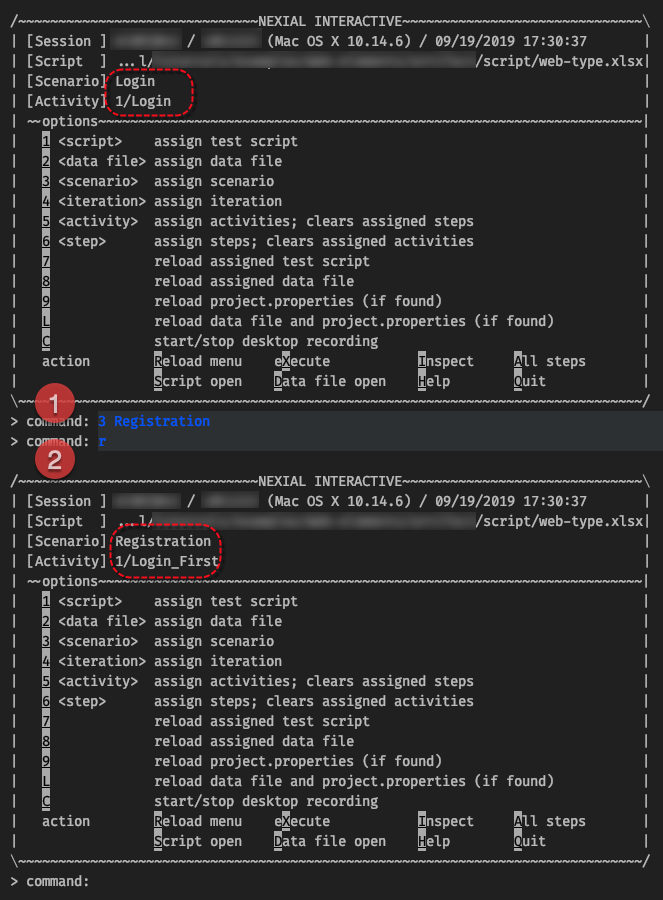
4 to assign a different iteration in the current Nexial Interactive session.All Nexial execution contains at least 1 iteration. The first iteration is loaded by default. To utilize the data of another iteration, we can use this option to load and override existing data variables. The effect and usefulness of this is similar to that of assigning a different data file (Option 2), where one can execute the same script with a different set of data than what was initially loaded.
Here's how From the
command: prompt, enter 4 then
the iteration index (1-based). The specified iteration must exist in the assigned data file. Below is an
example of this feature in action:Suppose this is the data file that is loaded in the current Nexial Interactive:

We can confirm that only the data in Iteration 1 is loaded in the current Nexial Iteration:
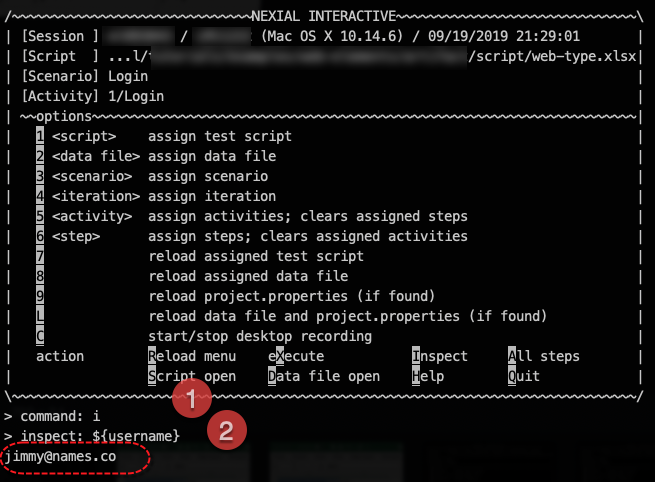
To load the data from Iteration 3, enter
4 3. After that, we can see that the same data
variable username has been updated to what is set to Iteration 3: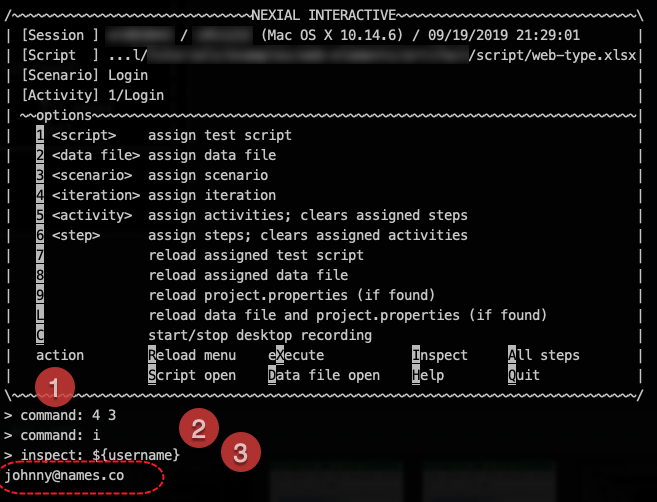
5 to assign a specific activity or activities to
execute in the
current Nexial Interactive session.Using this option, one can alter the intended order of execution as laid out within a scenario. One can skip over or re-run certain activity, or alter the order of execution amongst the activities of a scenario. Much like the purpose of other options in Nexial Interactive, this option allows one to explore the behavior and edge cases of the target application.
Here's how From the
command: prompt, enter 5 then
either the name of the activity to execute, or its "index". For multiple activities, one may also specify
a list of activities as a range. For example, 2-5 means the second activity through the fifth
activity. We can also use 2,3,4,5 to reach the effect. Let's see this in action via the
following example:Suppose this is the script that is currently loaded in Nexial Interactive:
We can see (screenshot below) that the 2 activities are properly recognized and displayed in the Nexial Interactive menu. To execute just the first activity - "Open Example Site", enter
5 Open Example Site. We can reload the
menu (r) to verify that the activity list has been updated: 
We can also switch the order of the activities. Below we are using the "index" instead of the activity names:

Note that this option only changes the activity or activities to execute. To commence the execution, use
X.
6 to assign specific steps to
execute
in the current Nexial Interactive session.Using this option, one can alter the intended order of execution as laid out within a scenario. One can skip over or re-run certain step(s), or alter the order of execution amongst the steps of a scenario. Much like the purpose of other options in Nexial Interactive, this option allows one to explore the behavior and edge cases of the target application.
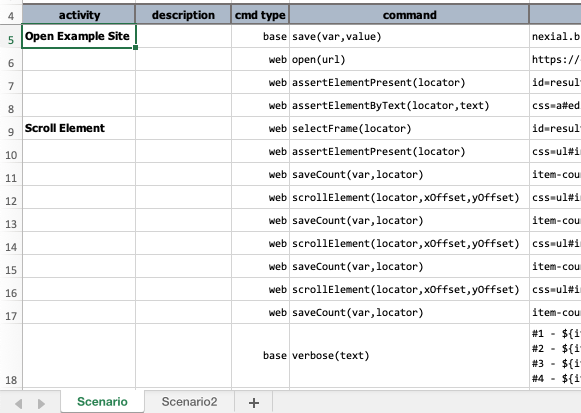
Here's how From the
command: prompt, enter 6 then
the row number of the step(s) to execute. For multiple steps, one may also specify them in range - as in,
5-9 - or as individual steps such as 5,9,12,6,8,8. Let's see this in action via
the following example:Suppose this is the script that is currently loaded in Nexial Interactive:
We can see (screenshot below) by default Nexial Interactive will execute all the steps via the activities found in the current scenario. To change to execute Step 8 through Step 12, enter
6 8-12. We can reload the menu (r) to verify that the target steps to
executed have been updated: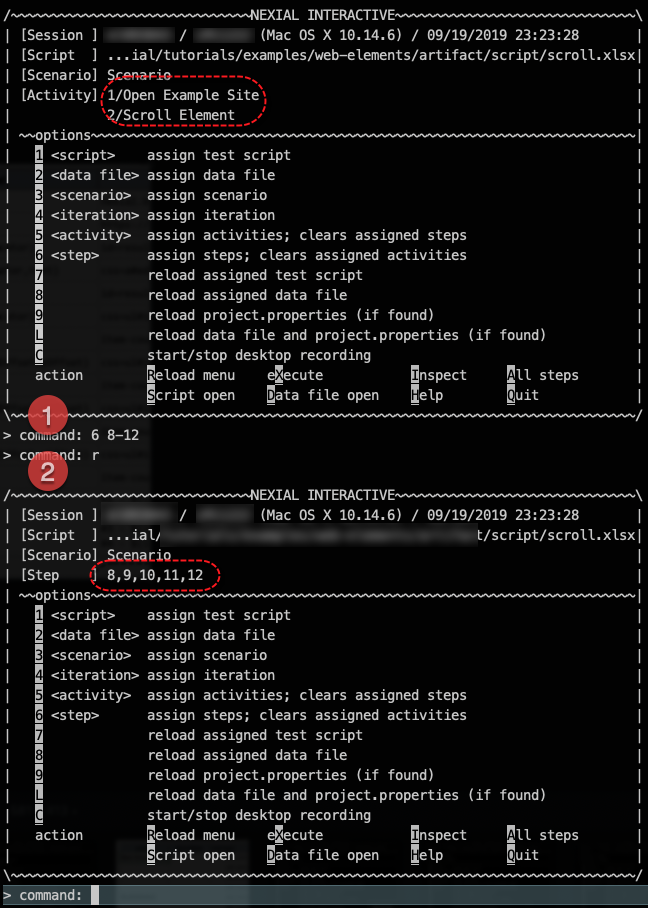
We can also switch the order of the steps:
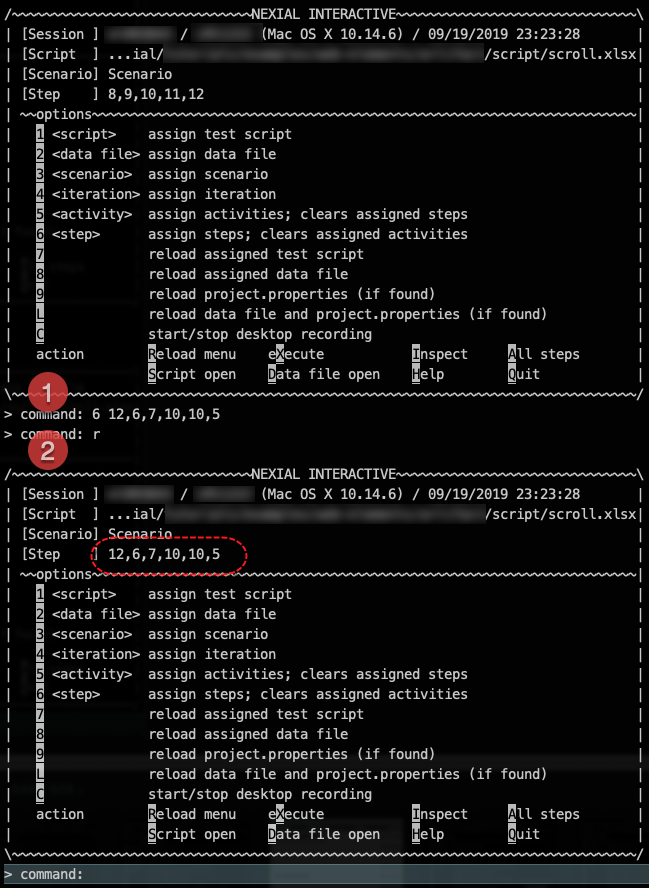
Note that this option only changes the step or steps to execute. To commence the execution, use
X.
L to reload the assigned test script, data file and the current project's
project.properties file.For more details, see:
7 reload assigned test script8 reload assigned data file9 reload project.properties fileC to toggle desktop recording during current Nexial Interactive sessionNexial Interactive gives one the flexibility to alter execution sequence and data, and to try out different ways of interacting with the target application and with Nexial. As such, it may be beneficial to record the various executions, along with the changes, the try-outs, the back-and-forth. One can use such record to retrace the steps that uncover a defect or complete a previously failed scenario.
This is the main purpose of this feature. One can enter
C to toggle the start and stop of
desktop recording, and then utility the recording later for investigative purpose. Note that the desktop
recording is only effective on the "Primary Monitor" - otherwise known as "Screen 1". It would be a good
habit to always
execute one's
automation on the primary monitor. Let's see this in action:To start the desktop recording, enter
c: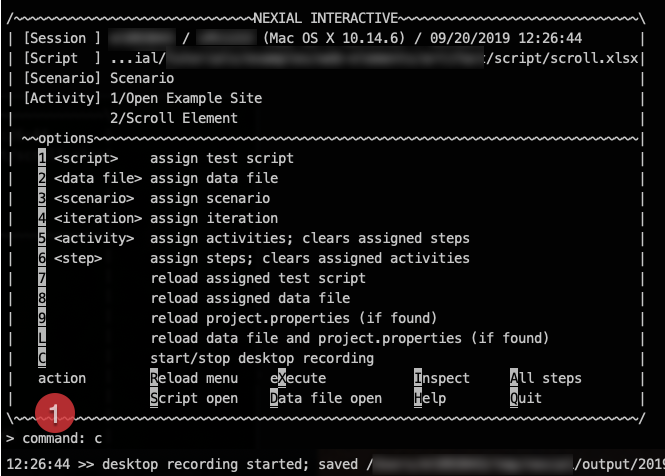
Now we can proceed with the automation. We can also use Inspection or any features of Nexial Interactive. As long as the actions carried out is visible on the primary monitor, these actions will be recorded:
Finally we can enter
c again to end the recording. Notice that the recorded video file (mp4) is
displayed on the console. Nexial Interactive prompts us with 3 choices:Pto play this video,Sto show the video file in the file manager, andDto delete it
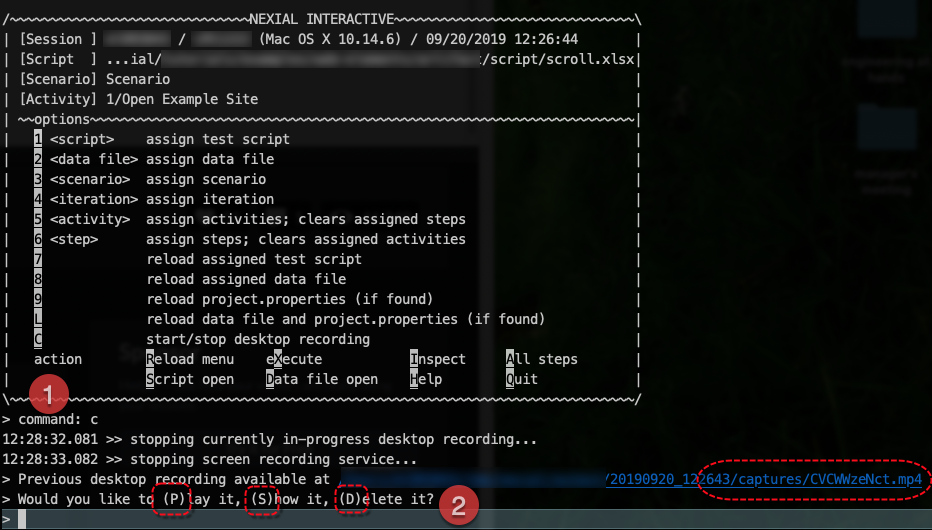
As an example, when we enter
s, the video file in question is displayed:
R to refresh Interactive Interactive menu.After reassigning script, data file, scenario, iteration, activity or step, it's usually a good idea to re-render the Nexial Interactive console menu again. In doing so, Nexial Interactive will display the script, scenario, activity or steps that are designated to execute. For example, see below and notice the change in Activity between the Refresh menu option being activated:
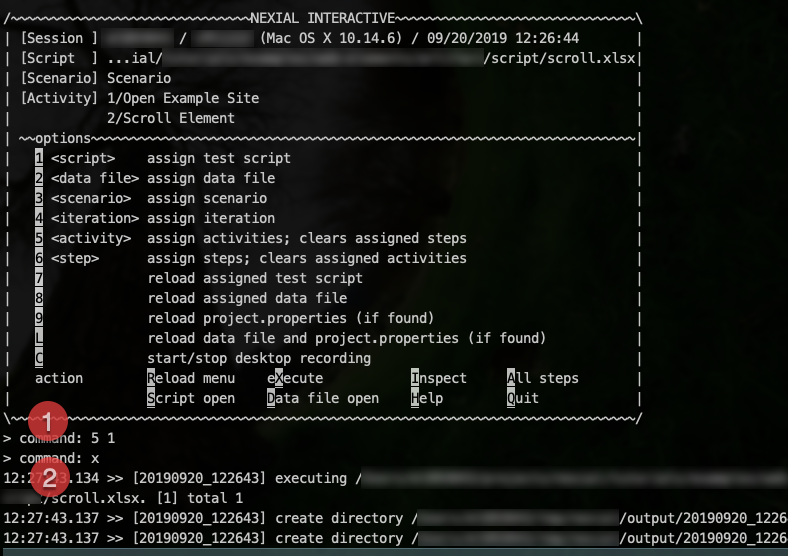
X to execute the assigned activities or steps.The automation runs as one would expect via the non-interactive (normal) Nexial execution, except that the execution steps might be different. As expected, the execution log will be displayed on the console as well. At the end of execution, Nexial Interactive will display a summary of the execution, like this:
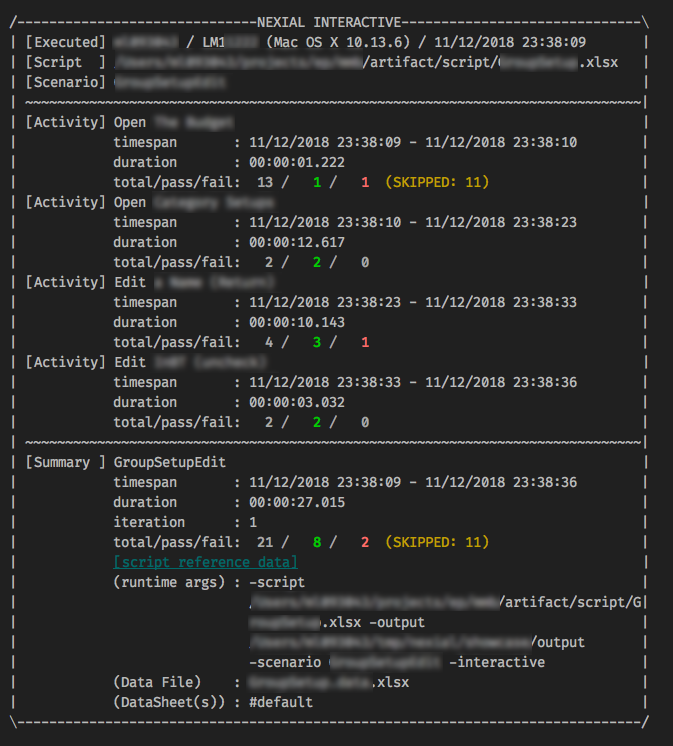
It is noteworthy to clarify that execution under Nexial Interactive will NOT generate the execution output or summary files. Due to its interactive nature, any generated output files/reports wouldn't be meaningful.
I to enter into Inspection.One can also activate Inspection (similar to
nexial.inspectOnPause to analyze and learn about data variables,
built-in functions, and Nexial expressions].
Its ability to expose data variables post-execution makes it a helpful tool for root cause analysis. One can
also use Inspection to learn or analysis complex expression, JSONPath, built-in
functions, etc.To show the current value of a data variable, use the
${...} syntax. To execute a built-in
function, use its $(...) syntax. For expression, the defined [DATA-TYPE(...) => ... ... ]
syntax is expected. See below for some examples:
Furthermore, one may create, modify or clear data variables on-the-fly in Inspection.
SAVE(var) syntax allows one to create or override a data variable. The value of such
data variable may be literal or derived from built-in functions or Nexial Expression.CLEAR(var1,var2,...) syntax allows one to clear one or more data variables, except
those that are read-only or defined in the command line -override flag.CLEAR(*) syntax is a special case of CLEAR(var1,var2,...). Its purpose is
to clear off all user-defined data variables except defined on command line (via -override flag)
and those defined in project.properties.> inspect: SAVE(myData) = [LIST(1,2,3,4,5,6,7,8,9,10) => sum] 11:15:15.786 >> LIST => sum NUMBER(55) 11:15:15.787 >> creating data variable [a] to [55]Starting with Nexial v3.7, Inspect in Nexial Interactive supports Desktop Automation as well. Here are the possible inspection features for Desktop Automation:
> inspect: CLEAR(b,a,nexial.runID) 11:14:27.730 >> removing data variable [b, a, nexial.runID] 11:14:27.731 >> The following data variable(s) are READ ONLY and ignored: nexial.runID 11:14:27.731 >> The following data variable(s) are removed from execution: a
> inspect: CLEAR(*) 11:14:27.730 >> removing data variable [*] 11:14:27.731 >> The following data variable(s) are removed from execution: 11:14:27.731 >> data1 11:14:27.731 >> password 11:14:27.731 >> target_url
DESKTOP(xpath) - inspect a desktop element based on XPATHDESKTOP(label) - inspect a desktop element based on a label in the current formDESKTOP(xpath) => click - click on a desktop element based on XPATHDESKTOP(label) => click - click on a desktop element based a label in the current formDESKTOP(xpath) => doubleClick - double click on a desktop element based on XPATHDESKTOP(label) => doubleClick - double click on a desktop element based on a label in
the current formDESKTOP(xpath) => type(input) - type the specified input on a desktop element based on
XPATHDESKTOP(label) => type(input) - type the specified input on a desktop element based a
label in the current formDESKTOP(xpath) => context(menu,menu,...) - simulate the activation of context menu (i.e.
right-click) on a desktop element based on XPATH, follow by the activation of such context menu via
the `menu` input. For sub-menu, use comma (,) to specify multi-level of sub-menu to
activate.DESKTOP(label) => context(menu,menu,...) - simulate the activation of context menu (i.e.
right-click) on a desktop element based on a label in the current form, follow by the activation of
such context menu via the label parameter(s). For sub-menu, use comma (,) to
specify multi-level of sub-menu to activate.DESKTOP(xpath) => menu(label,label,...) - simulate the activation of the application menu
on an application window based on XPATH, follow by the activation of the sub-menu(s) items. Each level
of sub-menu items are separated by comma (,). Note that the specified XPATH must resolved
to the "owning" window of the target application menu.DESKTOP(label) => menu(label,label,...) - simulate the activation of the application menu
of an application window based its "autoscan" label, follow by the activation of the sub-menu(s) items.
Each level of sub-menu items are separated by comma (,). Note that the specified label
must resolved to the "owning" window of the target application menu.DESKTOP(app) => menu(label,label,...) - click on one or more application menu items on the
current form. This is effectively the same as DESKTOP(label) => menu(label,label,...)For more information and examples, read Inspecting Desktop Elements in Nexial Interactive.
T to purge Nexial-generated temp files that are generated during automation.During execution, Nexial generates temp files as the transient execution result. Generally speaking, these temp files are purged after some time. However, one can use this option purge these temp files immediately to reclaim needed disk space or if excessive temp files is a performance concern. Note that as a safety precaution, this command will only clear out files that are generated more than an hour ago.
S to open the assigned script.This is a convenience to open up the current assigned script:

D to open the assigned data file.This is a convenience to open up the current assigned data file:
O to open the output directory for the current Interactive session.This is a convenience to open up the current output directory using System-dependent file/folder manager program (e.g. File Explorer for Windows or Finder for MacOS)
H to display help information that contains further information on each of the options
available in Nexial Interactive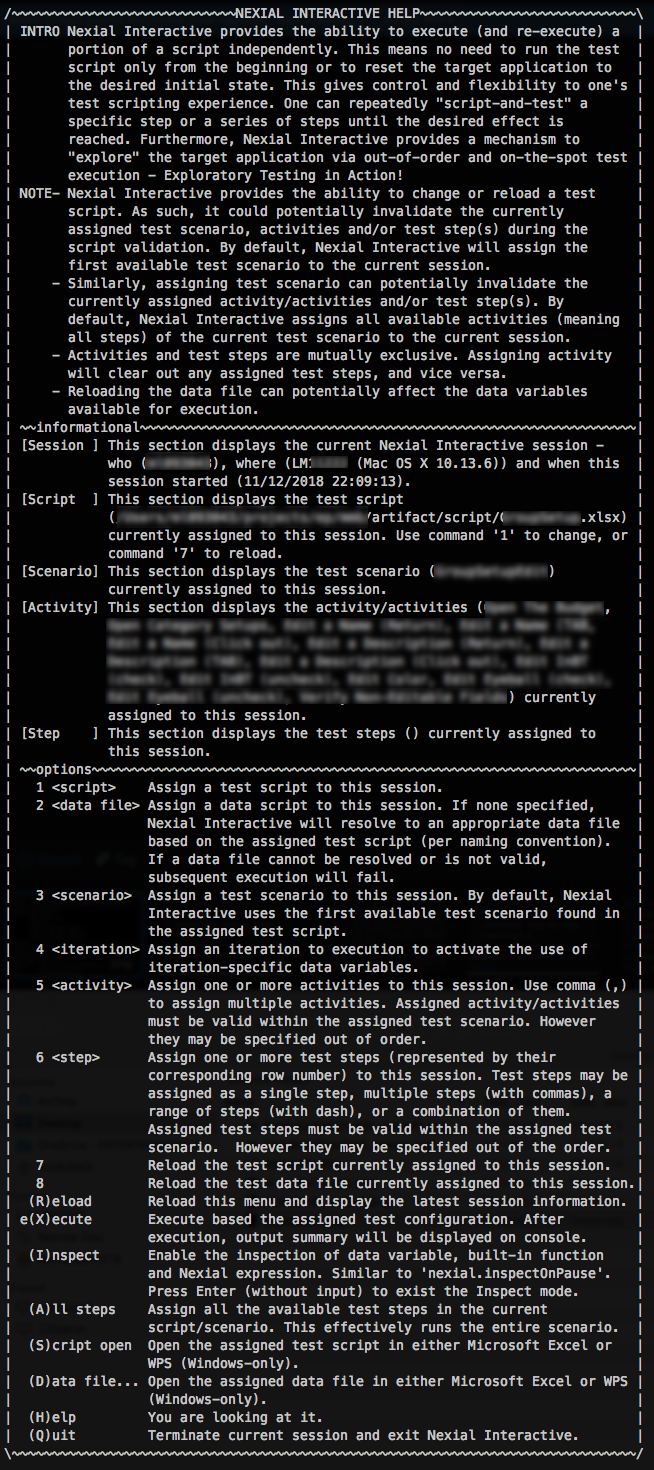
Q to quit Nexial Interactive.Note that all inflight changes to data variables or iteration assignment will be lost when Nexial Interactive ends.
Click here to learn more about Inspecting Desktop Elements in Nexial Interactive
Limitation
As time permits and as requests are made, further enhancements to Nexial Interactive will be implemented. Currently, here are the enhancement candidates that we are considering for future version of Nexial Interactive. No timeline has been committed as yet.
- Desktop GUI version of Nexial Interactive
- Switching between interactive and non-interactive (normal execution) mode
- Switch browser; currently some System variables cannot be adjusted within the same Nexial Interactive session
- Remembering last-run Nexial Interactive session to improve efficiency.
Also, please note the following limitations:
- The console scrollback limited by the console application (Command console for Windows and terminal for MacOSX). Please check the documentation of the respective console application on how to extend the scrollback limits.
- Cannot run steps in parallel.
- Nexial Interactive is not a true debugging environment. Yes, it can be an effective learning tool. But it is not - and probably never will be - equivalent to a true debugger like those modern-day IDEs.
Feedback
We love to hear your feedback! Give it a try and let us know what you think!