Batch Files
Introduction
Nexial ships with a variety of batch files and shell scripts to aid the process of automation. These scripts range from project creation to execution, and we will be adding more from time to time.
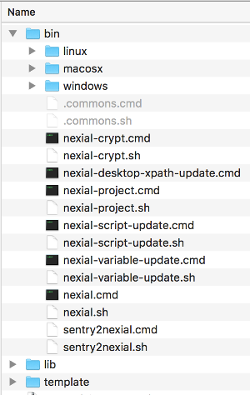
All batch files can be found under ${NEXIAL_HOME}/bin:
Available Batch Files
nexial
This is the main script is used to execute Nexial script or plan. This command has following command line options:
| options | explanation |
|---|---|
-data |
This option will ensure the data file location relative to executing script. Default data file is ../data/<script_name>.data.xlsx. |
-datasheets |
This option will restrict to a comma-seperated list of data sheets for this test execution. Default will utilize all the sheets of data file. |
-interactive |
[optional] Run Nexial in Interactive Mode. |
-output |
This will ensure output directory where results are stored. Default location is ../../output relative to script/plan. |
-override |
[optional] Add or override data variables in the form of name=value. Multiple overrides are supported via multiple -override name=value arguments.Note that variable name or value with spaces must be enclosed in double quotes. |
-plan |
This option is for running plan. This will require full path of plan. This is required if -script is missing. |
-subplans |
This option is for running specific worksheets(subplans) of plan. This will require one or more worksheets separated by comma. This will work for single plan execution. |
-script |
This option is for running script. This will require full path of script. This is required if -plan is missing. |
-scenario |
This will run one or more test scenarios separated by comma. |
Example
- Execute a Nexial script:
nexial.cmd -script c:\projects\myProject\artifact\script\myProject.xlsx - Execute a Nexial plan:
nexial.cmd -plan c:\projects\myProject\artifact\plan\myProject.xlsx - Execute one or more specific subplans of single plan file:
nexial.cmd -plan c:\projects\myProject\artifact\plan\myProject.xlsx -subplans testPlan1,testPlan2 - Execute one specific scenario (i.e. worksheet):
nexial.cmd -script c:\projects\myProject\artifact\script\myProject.xlsx -scenario test1 - Execute 2 scenarios with data variable overrides
nexial.cmd -script c:\projects\Project1\artifact\script\script17.xlsx
  -scenario scenario1,scenario1a
  -override nexial.outputToCloud=true -override myData=XYZ
Cleaning up Temp Files
As part of execution, Nexial create temp files to store any in-flight automation artifacts. These temp files might not get clean up properly. Over time, these temp files could create additional strain on the execution host (i.e. disk space). To circumvent such issue, starting from Release 3, Nexial now will perform a quick routine clean up process at the start of an execution.
At the start of an execution, Nexial will checks for a configuration file stored in ${user.home}/.nexial/config.json.
This file contains the timestamp of when the last clean up was performed. As deemed necessary, Nexial will automatically
clean up outdated temp files it had previously created. This .nexial/config.json file will be automatically created
by Nexial. This file looks something like this:
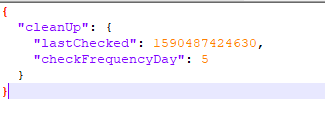
Note that,
lastChecked: This shows last time when Nexial performed a temp file clean up.checkFrequencyDay: This indicates the number of days sincelastCheckby which Nexial will perform the next temp file clean up. The default value of this configuraiton is 5 days.
Separately, one can also force a clean up via the bin/nexial-temp-clean script.
nexial-setup
This is the script used to setup the user specific configurations. This command has following command line options:
| options | explanation |
|---|---|
-file or -f |
This is the location of the configuration (in the form of key value pairs) user wants to setup. |
-key or -k |
This is the key used to encrypt the data. |
Example
- Setup user defined configurations:
nexial-setup.cmd -f "C:\Projects\config.data" -k "|7FDo8#Q;;mZ>G22"
Usage
- Open a console and point it to
${NEXIAL_HOME}/bin - Run
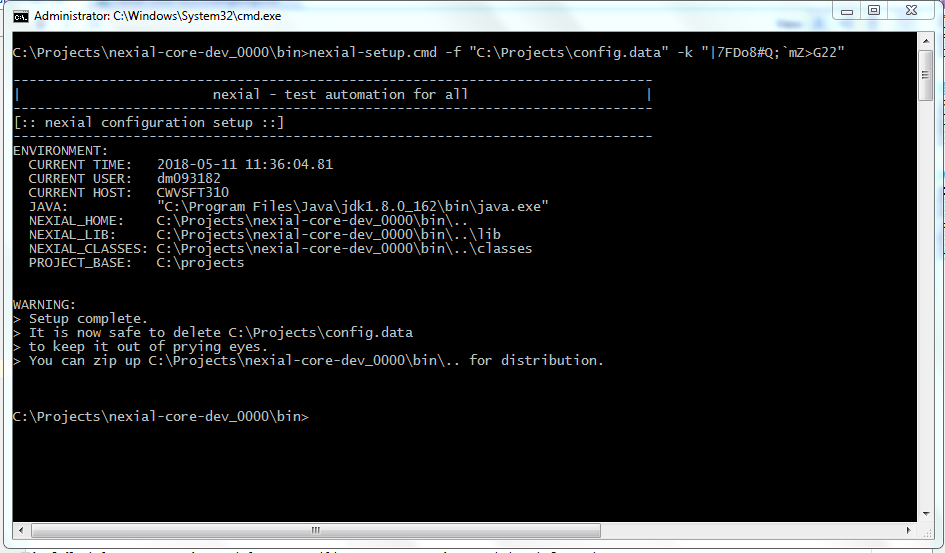
nexial-setup.cmd(Windows) or./nexial-setup.sh(*NIX, OSX) with the configuration file and the secret key as follows:
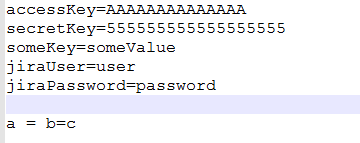
nexial-setup.cmd -f "C:\Projects\config.data" -k "|7FDo8#Q;;mZ>G22" - The config.data file content looks like the following:
- When the Nexial command is run with the appropriate arguments it creates a lib called setup.jar inside the lib folder.
Also a message is displayed asking you to delete the config file as shown below:
- Now you can further zip this using the
jarcommand and distribute it further with the team. For example:
jar -cf nexial.zip . - That is it! The latest zip you have is configured with the necessary configurations.
Note
- For information about setting up an email-server configuration please look at One Time Server Setup on the Email Notifications page.
nexial-crypt
This script is used to encrypt the sensitive data.
For sensitive information such as password, it may be important to store them encrypted at rest to avoid tampering or
misuse. The nexial-crypt.[cmd|sh] script is used to support this. At a high level, this is how it works:
- A Nexial user uses the nexial-crypt utility to encrypt the sensitive information.
- The nexial-crypt utility provides the encrypted form back to the Nexial user.
- Nexial user then copy the encrypted data into the appropriate data file.
- During automation, Nexial will dynamically decrypt the encrypt data as and when it is referenced within the corresponding Nexial script.
- However, Nexial will not convert the encrypted form to its original form in the Nexial output file(s).
It should be considered as best practice to encrypt information that would otherwise be misused. In a team setting where automation scripts are made available (e.g. via SCM), this is especially important.
Usage
- Open a console and point it to
${NEXIAL_HOME}/bin - Run
nexial-crypt.cmd(Windows) or./nexial-crypt.sh(*NIX, OSX) with the target sensitive data as an argument:
- The script will encrypt the argument and provide the encrypted form:
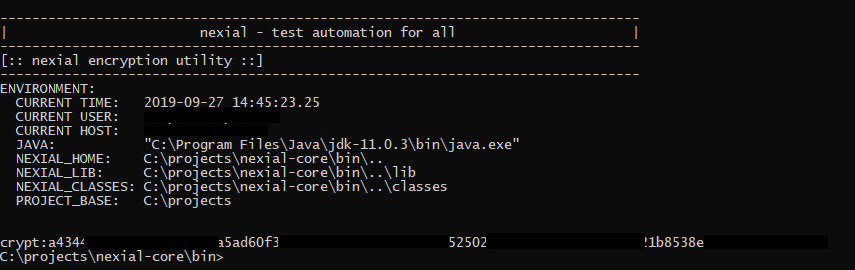
- Copy the highlighted encrypted data (including
crypt:) to data file: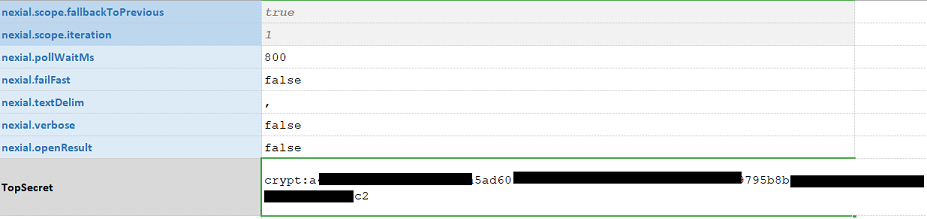
- That’s it! Now you can reference this data via its name, as is
${TopSecret}.
Notes
- At times, using command line console (especially on Windows) can present some challenges when encrypting special
characters such as pipe (
|), percent (%), ampersand (&) or question mark (?). When dealing with special character, be sure to surround the entire input parameter with double quote. For example,
nexial-crypt.cmd "ab&c"
nexial-crypt.cmd "ab|c" - If the intent input contains double quote (
"), then one would need to surround the entire input with double quote, and also prepend the double quote with another double quote. For example,
nexial-crypt.cmd "ab""c"
nexial-desktop-xpath-update
This script updates the XPath(s) used for desktop automation (i.e. application.json). This script has the following options:
| options | explanation |
|---|---|
-t |
[REQUIRED] This option is for location of a single JSON test script or a directory to update. |
-v |
This option is to turn on verbose logging. This is optional. |
nexial-project
This command is used to create new nexial-project. For example, the following will create a new project with the name
projectName. By default, it will be created in C:\projects\projectName folder for Windows, or
/Users/<user_id>/projects/projectName for MacOSX/*NIX:
nexial-project.cmd projectName
nexial-project.sh projectName
Example
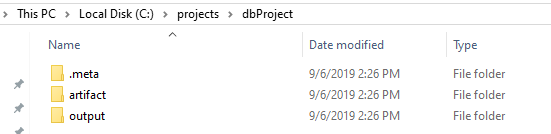
Command
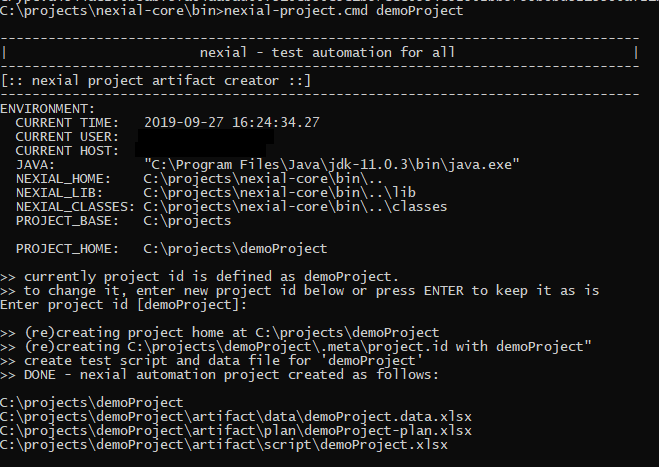
Project Created
To see a quick demo on this batch file, check out the Create/Maintain your Nexial project artifacts video.
nexial-script-update
This script updates one or more test scripts with the latest available commands (dropdowns in spreadsheets). It has
two command line options:
| options | explanation |
|---|---|
-t |
[REQUIRED] This option is for location of a single Excel test script or a directory to update. |
-v |
This option is to turn on verbose logging. This is optional. |
-u |
Auto-correct duplicate activity names within one scenario. The duplicate activity name will be append with a number at the end and thus making it unique within the same scenario. |
Example
The following will update all the scripts from given path.
nexial-script-update.cmd -v -t C:\projects\myProject\artifact\script -u
nexial-tms-importer
This script imports Nexial test cases to provided TMS tool via system variables. Follow TMS Management to configure TMS tool. This command will also update already existing test cases in TMS.
| options | explanation |
|---|---|
-plan |
This option is for importing plan test cases to TMS tool. This will require full path of plan. This is required if -script is missing. |
-subplans |
This option is for importing specific worksheets (subplan) of plan. This will require only one worksheet This is required if -plan is provided. |
-script |
This option is for importing script test cases to TMS tool. This will require full path of script. This is required if -plan is missing. |
-b |
This will follow BDDKeyword formatting while importing testcase. |
-c |
This will close previous test runs for this script before importing testcases. |
Example
- Import a Nexial script to TMS with BDD keywords formatting:
nexial-tms-importer.cmd -script c:\projects\myProject\artifact\script\myProject.xlsx -b - Import one or more specific scenario(i.e. worksheet) of script:
nexial-tms-importer.cmd -script c:\projects\myProject\artifact\script\myProject.xlsx -scenario test1,test2 - Import specific subplan of Nexial plan to TMS
nexial-tms-importer.cmd -plan c:\projects\myProject\artifact\plan\myProject-plan.xlsx -subplan testPlan1 - Note: This command doesn’t support import of more than one subplan of plan file at once.
nexial-variable-update
This script refactors the data variables referenced across test artifacts to provide uniformity across script authors
and teams. One may specify the current keys and new keys in the form of:
-d "key1=NEW_KEY1;key2=NEW_KEY2;..."
This script has four command line options:
| options | explanation |
|---|---|
-d |
[REQUIRED] This option is for data variables to replace in the form of old_var=new_var |
-t |
[REQUIRED] This option is for providing the path of project/starting location of update data variable |
-v |
This option is to turn on verbose logging |
-p |
This option is to preview the results for the data variables being updated without affecting any files. So it won’t update data variables across artifacts. |
For example, The following renames the key oldKey1 to newKey1, and oldKey2 to newKey2, and so on:
nexial-variable-update.cmd -v -d oldKey1=newKey1;oldKey2=newKey2;oldKey3=newKey3 -t projectFullPath
If you just want to examine the positions of oldKey1, oldKey2 and so on which will be affected, but don’t
want to refactor them. Following will preview the substitutions:
nexial-variable-update.cmd -v -d oldKey1=newKey1;oldKey2=newKey2;oldKey3=newKey3 -t projectFullPath -p
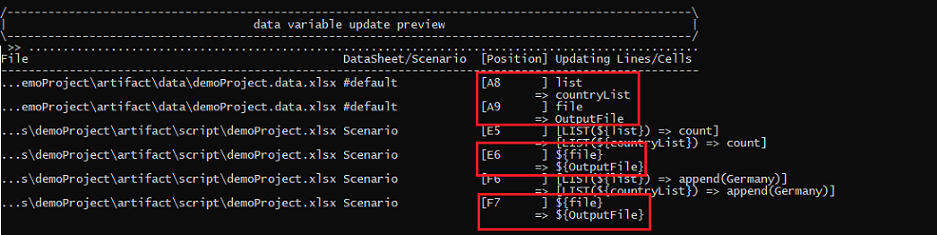
Format of data variable update preview has four columns:
| column | explanation |
|---|---|
File |
This will have relative path of file with respect to starting location of update data variable given by -t command line option. |
Worksheet/Scenario |
This will have worksheet name of data file or scripts. |
Position |
This is the position of line/cell being refactored/affected. |
Updating Lines/Cells |
Updating lines/Cells column will have line/cells before replacement and after replacement separated by =>. |
Example
Let’s have a look at variable update preview. Following command is executed for the preview:
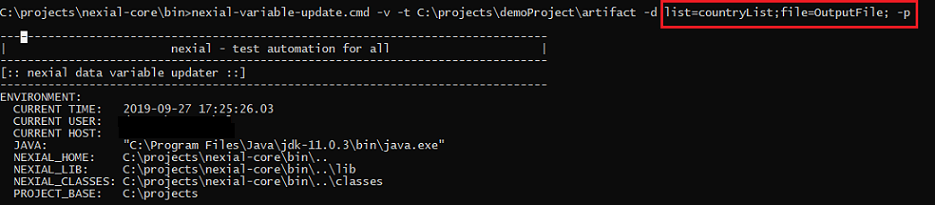
The variable update preview would look like so:
nexial-log-parser
This script captures required log statements (mainly for elapsed time between request and response of given step) from a log
file generated through execution and stored to new file.
| options | explanation |
|---|---|
-t |
[REQUIRED] This option is for provding the location of a log file to be parsed. |
-s |
[REQUIRED] This option is for providing the location where a new log file is to be generated. |
-c |
This option is for specifying type of logs to be tracked. Possible values for this are desktop, rdbms, ws and all(default). This is optional. |
Example
The following will create new log file with required logs only.
nexial-log-parser.cmd -t C:\projects\myProject\output\20180608_121212\nexial-20180608_121212.log -s C:\projects\myProject\newLogs.log -c ws
This will extract ws request and response logs from nexial-20180608_121212.log and store it to newLog.log.
This script comes into picture when one wants to capture response time for step. For example, someone wants to do
performance testing for API calls, ws criteria will gather information about request and response time from logs and
calculate elapsed time for the same.
nexial-project-inspector
The script scans existing artifacts of a project and generate an interactive HTML report.
This script has the following command line options:
| options | explanation |
|---|---|
-m |
Specify how output will be viewed (local or remote). Default is local. |
-t |
[REQUIRED] This is for providing the location of the project directory to scan. |
-v |
Turn on verbose logging. |
Example
The following script will scan the demoProject directory
nexial-project-inspector -t C:\projects\demoProject -v
nexial-macro-update
This script refactor the macro name referenced across test scripts and macro files to provide uniformity across script
author and teams.
This script has four command line options:
| options | explanation |
|---|---|
-t |
[REQUIRED] This option is for providing the path of project/starting location of updating macro. . |
-f |
[REQUIRED] This option is for providing the file name of macro from which macro name to be replaced. |
-s |
[REQUIRED] This option is for specifying worksheet of above macro file. |
-m |
[REQUIRED] This option is for specifying the macro name which needs to be replaced across scripts. |
-p |
This option is to preview the results for the macros being updated without affecting any files. |
Example
The following renames the macro oldMacro1 to newMacro1, and oldMacro2 to newMacro2, and so on:
nexial-variable-update.cmd -t searchPath -f macroFile -s macrosheet -m oldMacro1=newMacro1,oldMacro2=newMacro2
nexial-artifact-repair
This script repairs the artifacts by removing unnecessary, non-existing url links, comments from original file.
This is mostly useful when excel file has links to non existing files asking for updated everytime the user opens the file.
However, the updates fail because the target file does not exist.
This batch file only supports Nexial excel files e.g. script, plan, data, macro files.
If preview location(-d) is not provided, it will take backup of original file and override the original with repaired file.
Note
- Maximum row and column limit to read/write data is set to
10000. - Maximum row and column limit is more likely to impact on data files.
- This script will read/write data till the first empty row. Rows after first empty row is ignored.
This script has following command line options:
| options | explanation |
|---|---|
-t |
[REQUIRED] This option is to provide the path of project/starting location or file for repairing artifact. |
-d |
[OPTIONAL] This option is to provide the destination path to preview repaired files without affecting original file. |
Example
The following repair all files from searchPath and store at destinationPath.
nexial-artifact-repair.cmd -t <searchPath> -d <destinationPath>
nexial-custom-jar
At times, additional 3rd-party library files (jar) might by needed in order to sufficiently perform the desired
automation. For example, one might need to use a specialized database driver (JDBC), or vendor-specific JMS client
library. Or, perhaps one has set up a company-specific setup.jar to connect to company-specific
email server or AWS account. In order for Nexial to utilize these jar files, they should be placed in
${user.home}/.nexial/jar directory.
To simplify the copying of these “custom” jars, and possibly to update them periodically, this simple batch script is created to aid in that.
Steps:
- [ONE-TIME] Create a directory on a network shared drive. This directory should be reachable by other Nexial users on the network as well.
- [ONE-TIME] Place all the custom jar files in this shared directory.
- Each user would run the following command on his/her workstation:
nexial-custom-jar.cmd <shared directory>or
nexial-custom-jar.sh <shared directory> - Nexial will then copy all the jar files found in the specified shared directory to
${user.name}/.nexial/jar. Existing jar files will be overwritten. - When there are new jar files to distribute, simply repeat Step 2 and 3!
Note that more than 1 shared directory may be specified.
This is mostly useful when one wants to add some additional libraries, JDBC drivers, JMS clients, etc. during one’s automation. To learn more about custom jars please click here.
Note
- Source location can be directory or file path.
- User can specify multiple source locations.
Example
The following will copy all files from sourcePath and store at ${user.home}/.nexial/jar.
nexial-custom-jar.cmd <sourcePath>
For copying files from multiple location:-
nexial-custom-jar.cmd <sourcePath1> <sourcePath2> <sourcePath3>
nexial-temp-clean
This script will remove the temp files created by Nexial during an execution. Note that only the temp files that are more than 1 day old will be removed.
This script has following command line option:
| options | explanation |
|---|---|
-v |
Turn on verbose logging. |
Example
The following will clean up directories from TEMP folder created during Nexial execution.
nexial-temp-clean.cmd -v
nexial-lib-downloader
This script will download the nexial-lib library to ${user.home}/.nexial/lib/. This library (nexial-lib) is required
by nexial while running any script.
User don’t need to run this script manually, this will be called when we will run any script using nexial.cmd/nexial.sh.
Nexial will automatically decide whether it should download or not based on the version configuration in ${NEXIAL_HOME}/lib/nexial-lib-version.txt file.
If you want to run this manually you can run it, you don’t need to pass any command-line argument.
Example

nexial-swagger
Swagger file written adhering to the Open API specifications in tandem with documentation generation tools can be used
across the team to share the definitions of the Restful API operations/methods. These are generally written in json
or yaml format as per the standards specified.
Once the Swagger file is shared with the QA Automation team, they can start writing the Nexial scripts corresponding
to the RESTFUL API definitions mentioned in the Swagger file. This process may be tedious particularly when the number of API
operations are more in number. Inorder to solve this problem, the nexial-swagger script helps you to generate an
automated script(and supporting artifacts) which contains steps for performing the validation of Restful API operations
and other artifacts like properties file, data file, Schema files etc. which provides necessary configuration variables
with blank or empty values.
While the script generated may not cover all the validations as expected by the Automation Engineer, the generated script works like a template with most of the ready-made steps and the necessary configuration variables declared with blank or empty values. The Automation Engineers can easily tailor the generated scripts per their need.
Refer for a detailed explanation.
This script has the following command line options:
| options | explanation |
|---|---|
-f |
[REQUIRED] This option is provides the Swagger file location path. |
-d |
[REQUIRED] This option is provides the Nexial directory folder inside which the necessary script and other artifacts needs to be created. |
-p |
[REQUIRED] This prefix which represents the generated script name. |
Example
The following command takes the Swagger file specified with -f parameter and generates the necessary script and the
artifacts inside the Nexial project defined in the -d folder with a version prefix specified with -p.
nexial-swagger.cmd -f C:\Swagger\accounts.json -d C:\projects\accounts -p V1