ws
ws is short for Web Service. For Nexial, this refers to any form of HTTP-based web services (REST, SOAP, etc.). The
ws set of commands provides a set of web service related interactions and validations. The specific of each command
are documented in the designated pages (below). However, there are a few common things to note:
ws header(name,value)
This command affects all subsequent ws commands. The main purpose of this command is to set up HTTP headers for the
subsequent web service invocations within the same Nexial execution. One can create a series of HTTP headers, and
modify or enhance them between web service invocations. For example:

HTTP Response
When an HTTP request is made, the corresponding server responds with a set of information generally known as
HTTP Response.
The response at the network transport layer looks something like this:
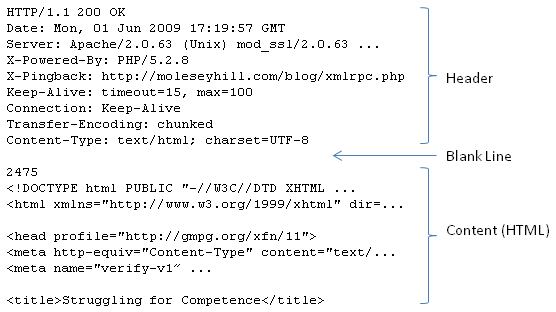
The response contains all sorts of useful information. Nexial captures such information and made them available during
execution to support validation and further processing. Each “response” object contains the following data:
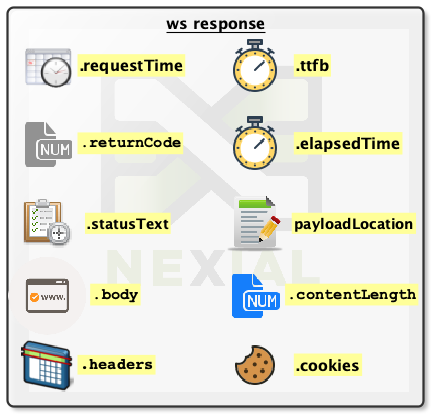
Assuming that the response is stored in a data variable named var, one can …:
- access the date/time, in epoch, of the corresponding request via the
${var}.requestTimesyntax. - use the
${var}.ttfbsyntax to retrieve the number of millisecond between the request sent from Nexial to the intended server and the time when the first byte (of response) is received by Nexial in return. “TTFB” stands for “Time-to-First-Byte”. - use the
${var}.elapsedTimesyntax to retrieve the number of millisecond between the request sent from Nexial to the intended server and the time when the entire response has been received by Nexial in return. - access the return code (status code) and status text via
${var}.returnCode}and${var}.statusTextrespectively. The purpose of these “data” in inherently the same, except the former is a numerical representation. Visit https://httpstatuses.com/ and HTTP Status Codes for more information. - access the response payload via the
${var}.bodysyntax. This usually returns some form of text, which can be further processed via thejsoncommand type,xmlcommand type oriocommand type for plain text. - access the length of the payload via
${var}.contentLengthsyntax. - determine the external file location which stores the response payload via the
${var}.payloadLocationsyntax. This is only applicable for ws »download(url,queryString,saveTo)command.
All HTTP response header information can be retrieved via the ${var}.headers.[HEADER_NAME] syntax (assuming response
is stored to the var data variable). For example, to retrieve response content type, we can specify
${var}.headers.[Content-Type]. HTTP response headers inherently also include cookie information. But to simplify
your scripting, Nexial provides a more direct access in the form of ${var}.cookies.[COOKIE_NAME].value.
Each cookie contains the following property:
- name: The name of a cookie. Syntax:
${var}.cookies.[COOKIE_NAME].name - value: The value of a cookie. Syntax:
${var}.cookies.[COOKIE_NAME].value - domain: The domain for which a cookie is considered valid and accessible. Syntax:
${var}.cookies.[COOKIE_NAME].domain - expiryDate: The date of when a cookie would be expired and removed from its attached browser. Date format is
Wdy, DD mmm yyyy HH:mm:ss GMT. Syntax:${var}.cookies.[COOKIE_NAME].expiryDate - path: The URL subset of the origin server to which a cookie was issue. Similar to the domain option, this is
another way to control access. The path indicates a URL path that must exist in the requested resource before
sending the Cookie header. Syntax:
${var}.cookies.[COOKIE_NAME].path - persistent:
trueorfalseto indicate if a cookie is a session cookie (expires when browser is restarted) or not (cookie is preserves between browser restarts). Syntax:${var}.cookies.[COOKIE_NAME].persistent - secure:
trueorfalseto indicate if a cookie requires a secure (HTTPS) connection for access. A secure cookie will only be sent to the server when a request is made using SSL and the HTTPS protocol. The idea that the contents of the cookie are of high value and could be potentially damaging to transmit as clear text. Syntax:${var}.cookies.[COOKIE_NAME].secure
Logging
Since v2.8, Nexial has the capability to externalize the request/response details as log files. This can be very helpful towards root cause analysis or tracking purposes. There are two types of logging: detailed and summarized.
Detailed Logging
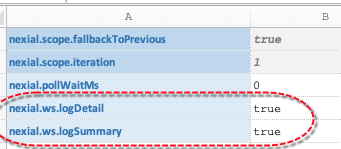
To enable detailed logging, set the System variable nexial.ws.logDetail to true. By doing so, all subsequent
web service calls issued via a ws command would be logged and linked to the corresponding test step in the output
file. For example:
Data File
Output File

Sample Detailed Log
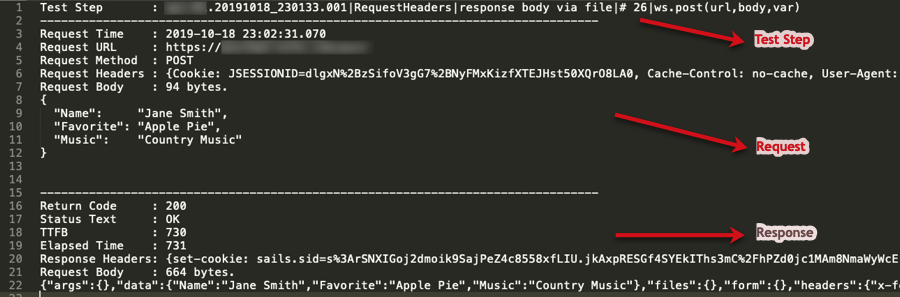
Each web service call would have its own log file.
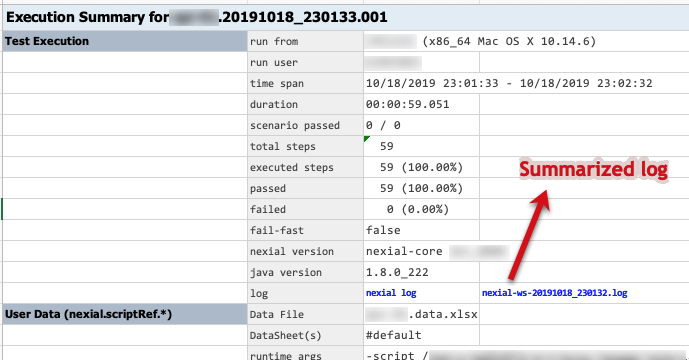
Summarized Logging
The summarized log is different from the detailed log in that it accumulates the timing and summary information about
each invoked web service calls in the same file. Such file can be useful for post-execution analysis across all the
web service calls made. To enable summarized logging, set the System variable nexial.ws.logSummary to true. The
summarized log will be linked in the #summary worksheet of the output file:
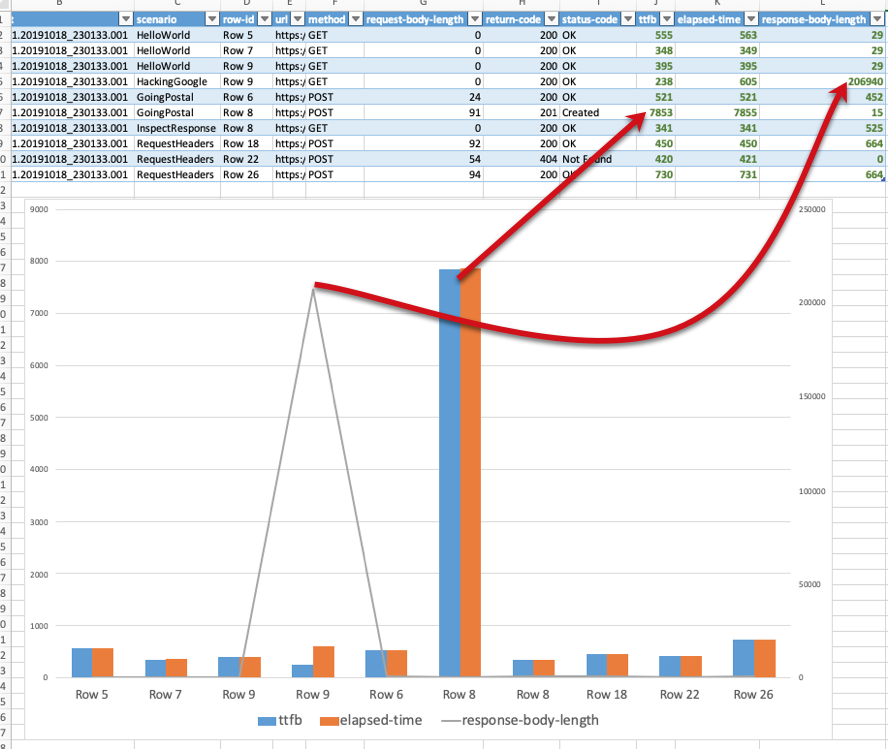
Here’s a sample of such summarized log file (CSV format):

Note that the first line of the log file is the column headers. One can import such CSV file to Excel (or similar) to
generate actionable visualization:
Script Generation from Swagger File
The nexial-swagger command is used to generate a script as well as the necessary supporting artifacts to configure the
variables, which provides the basic rudimentary steps to test the various operations(Restful API calls) defined in
the swagger file is provided as input to the command. The script and the other artifacts are created inside the Nexial
project directory which is passed as input to the command.
While the script generated may not cover all the validations as expected by the Automation Engineer, the generated script works like a template with most of the ready-made steps and necessary configuration variables declared with blank or empty values. The Automation Engineers can configure these variables and adjust the script as per their needs.
Here’s a summary of the nexial-swagger command (click on tab to view):
- Parameters
- Script File
- Properties and Data files
- Swagger file
- Schema Files
- Request Body Payload
- Batch File
- Content Types supported
- Authentication
-f or --file
This is a mandatory parameter that allows the script to specify the location of the Swagger file. The file can be in theYAMLorJSONformats. The Swagger file should adhere to the [Open API 3 specifications](https://swagger.io/specification/).
-d or --dir
This is a mandatory parameter that specifies the Nexial project directory inside which the script needs to be created. In case the project directory is not available the script creates a new Nexial project directory with all the necessary files and folders inside it.
-p or --prefix
This mandatory parameter acts as a prefix to represent the generated script name. The Automation Engineer can generate a new script (and corresponding artifacts) by running the command again with a new prefix.The following is an example of the command.
nexial-swagger -f C:\Swagger\users.JSON -d C:\projects\users -p V1In the above example we can see that
C:\Swagger\users.json is the location of the Swagger file,
C:\projects\users is the Nexial directory and V1 is the prefix.This script generates the following output:

artifact\script folder of the Nexial project i.e.
the directory passed using -d parameter. The name of the file will be the same as the
prefix passed using the -p parameter.Consider the following example:-
nexial-swagger -f C:\Swagger\users.json -d C:\projects\users -p V1The script file will be created inside the
C:\projects\users\artifact\scriptfolder with the
name V1.xlsx.So the complete path of the script file becomes
C:\projects\users\artifact\script\V1.xlsx.
Scenarios
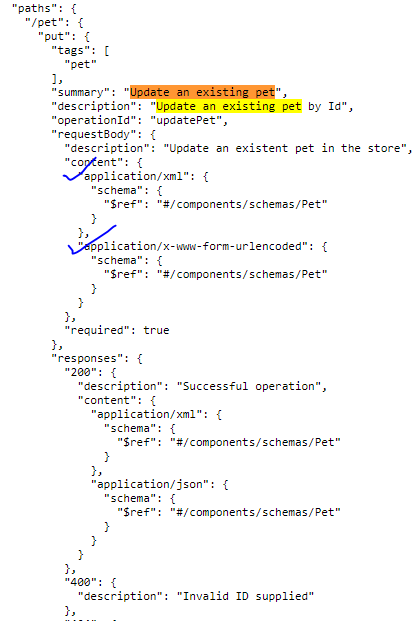
Consider the following Swagger example:-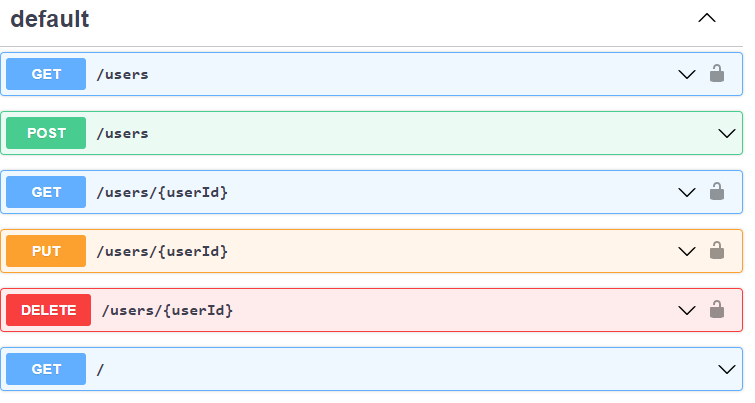
You can see in the above Swagger file there are 6 paths. Each of these become a scenario in the Script file. When the
nexial-swagger command is run on top of the above
Swagger file, the generated script looks as follows: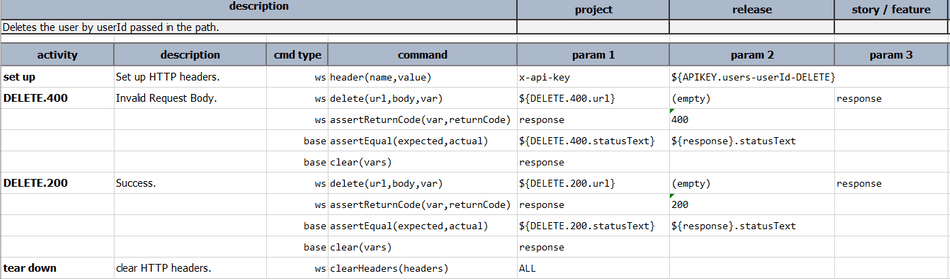
Scenario Name
Each scenario name generated will have a max of 31 characters. The scenario name will be in the format of{PATH}-{METHOD}. All the / characters will be replaced with -.
The curly braces({, }) will be removed.
All the spaces in the name will be removed. For example, if the path is /users/{username}
with the method DELETE the scenario name becomes user-username-DELETE.In case of any paths at root level i.e.
/ the scenario name will be given the format
{TITLE}-{METHOD}. For example, if the title of the Swagger file is Users Rest API.
For the path/ with the method GET the scenario name becomes
UsersRestApi-GET.In certain situations, the pathname generated may be too big i.e. larger than 31 characters. In such a case the last 31 characters become the scenario name. Consider the following example where the path for a
GET method is /logs/deptId/countryId/regionId/userId.
The scenario name will be d-countryId-regionId-userId-GET.Scenario Description
The description of the scenario as shown in the below diagram will be the same as the description of the path or the Restful API operation.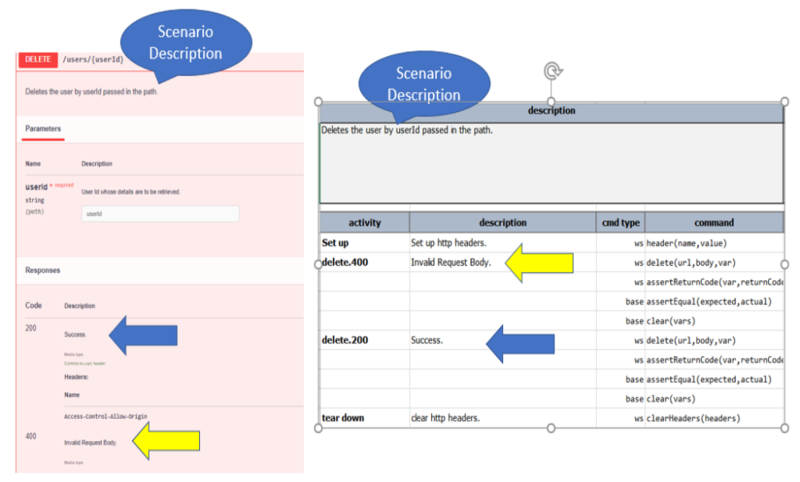
Activity
Each Activity in the scenario will be named{method}.{response}. Consider the above diagram
where the DELETE method has two responses viz 200 and 400.
Since there are two responses, two Activities are created with the names
DELETE.400 and DELETE.200 respectively. You can see the description of the Activity is the same as the description of the response code.
There are as many activities as the number of responses, but there may be additional Activities by names
Set up and tear down along with them in case any Authentication mechanism is specified for the
Restful operation.
Steps
The steps in the Activities are almost the same. TheSet up and tear down
activities have the steps to set the header(s) and clear the header(s) respectively.
The following picture shows the example Steps in a Scenario:
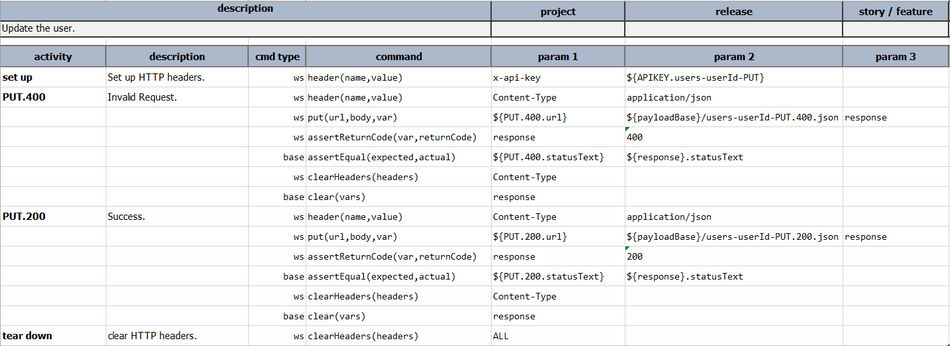
Activity has the following Steps:-
-
The Content-Type for the method. This may not be needed for methods like
GETandDELETEwhere there is no Request body. - Method invocation call where the parameters corresponding to the url, request body and the response are provided.
- Asserting the
return code, returned by the earlier step. - Asserting the
status text, returned by the earlier step. - There is an optional step to assert the correctness of the json response returned, validating against the Schema.
- Clean up steps i.e. the steps to clear the headers or response variables at scenario or activity level.
Note:- The variables used in these steps are configured in thepropertiesfile,Schemafiles,datafile as well as thepayloadfiles.
Properties file
The properties file contains the variables that need to be configured for running the script. Consider the following command.nexial-swagger -f C:\Swagger\users.json -d C:\projects\users -p V1
When the command runs it creates a properties file with the name as the prefix passed in.
In this case, it will be V1. So the name of the properties file generated will be
project.V1.properties. This will be created inside the artifact folder.
It has the following configuration variables.- Nexial defaults
- baseUrl
- payloadBase
- schemaBase
- Authentication variables
Nexial defaults
The properties will have the following Nexial defaultsnexial.delayBetweenStepsMs=0nexial.ws.logDetail=truenexial.ws.logSummary=truenexial.ws.connectionTimeout=30000nexial.ws.readTimeout=30000baseUrl
ThebaseUrl is retrieved from the Swagger file as shown in the below screenshot.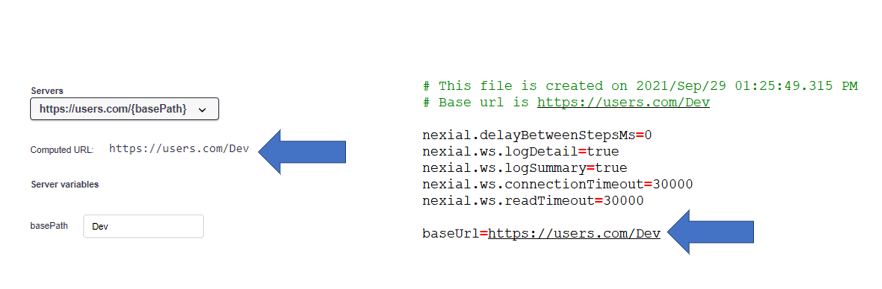
payloadBase
ThepayloadBase is the base path where the payload files are available. These files are used
to configure the request body payload.schemaBase
TheschemaBase is the base path where the schema files are available. These files provide the schema corresponding to the response generated after making a request.The following is an example of the payloadBase and schemaBase generated.
                payloadBase=$(syspath|data|fullpath)/V1/payload

                schemaBase=$(syspath|data|fullpath)/V1/Schema
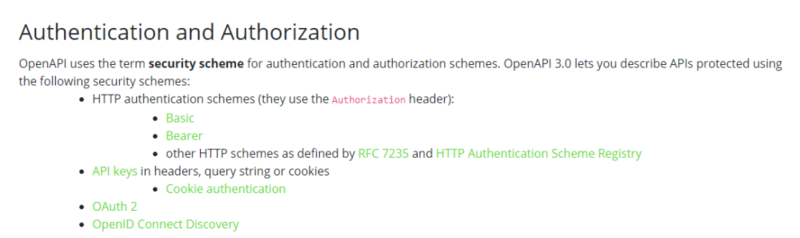
Authentication variables
The Authentication variables are the headers that are passed along with the URL request to ensure the authenticity of the user. The format of the Authentication is{AUTHENTICATION_MODE}.{scenarioName}.
The query parameter variables values are left empty so that the Automation Engineer can configure them.
e.g.:- APIKEY.users-userId-GETData file
The data file contains the rest of the configuration variables related to URL, cookies, path, header, query parameters, and status text variables. The following is an example of the data file content.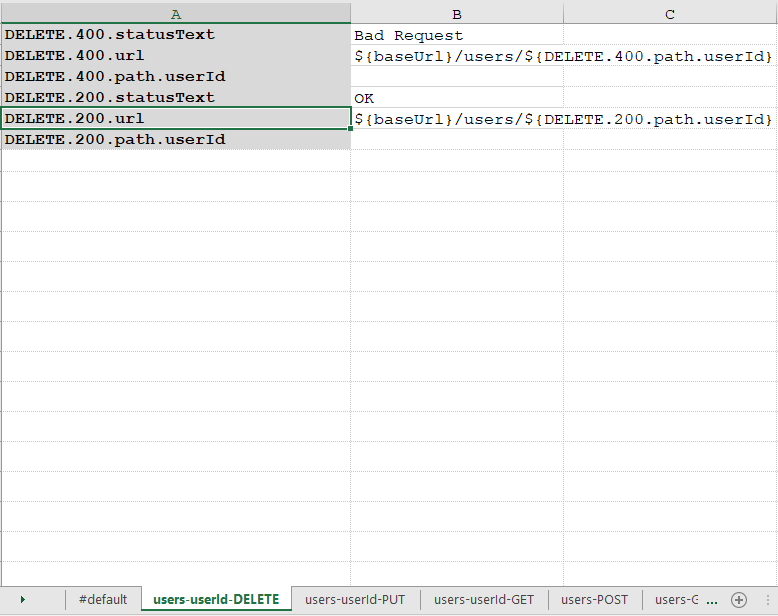
Consider the following command.
nexial-swagger -f C:\Swagger\users.json -d C:\projects\users -p V1When the command runs it creates a data file with the name as the
prefix passed in.
In this case, it will be V1. So the name of the data file generated will be
V1.data.xlsx. This will be created inside the data folder.url
The rest api url corresponding to the rest api. The following is an example as shown in the above screenshot where the url value for retrieving 400 response is configured in the following variable with the key asDELETE.400.url. The value corresponding to this will be:-
${baseUrl}/users/${DELETE.400.path.userId}.Path variables
The path variables are variables set in the request URL path. For example in the URLhttp://xyz.com/users/{userId}, {userId} is the path parameter.
Path variables are used to configure these path variable values by the Automation Engineer.
The format of is METHOD.{response}.path.{variableName}.
The variable values are left empty so that the Automation Engineer can configure them.
e.g.:- DELETE.400.path.userIdHeader variables
The header variables are used to configure the headers that are passed in as part of the HTTP request that is made. The format isMETHOD.{response}.header.{variableName}.
The variable values are left empty so that the Automation Engineer can configure them.
e.g.:- DELETE.400.header.tokenQuery parameter variables
The Query parameter variables are variables appended in the request URL path. For example in the URLhttp://xyz.com/users?pageSize=10, {pageSize} is the query parameter.
Query parameter variables are used to configure the values of the Query parameters by the Automation
Engineer.
The format of is METHOD.{response}.query.{variableName}.
The variable values are left empty so that the Automation Engineer can configure them.
e.g.:- GET.200.query.pageSizeStatus Text variables
The Status text variables represent the status text retrieved as part of the response to an HTTP request call. For example, when a call to retrieve specific user details may lead to a 400 response with the status textBad Request while a successful call may yield OK.
The format is METHOD.{response}.statusText.
The variable values are left empty so that the Automation Engineer can configure them.
e.g.:- POST.200.statusTextCookie Variables
The Cookie variables correspond to the cookies sent when the request is made. The format isMETHOD.{response}.cookie.{variableName}.
The variable values are left empty so that the Automation Engineer can configure them.
e.g.:- GET.200.cookie.x-auth-tokennexial-swagger command is run, the Swagger file passed in as part of the command is
saved into the {Nexial-project-directory}/artifact/data/{prefix} folder with the name
swagger.json or swagger.yaml.For example, if the command is
nexial-swagger -f c:\Swagger\users.json -d c:\projects\users -p V1, the swagger file created
becomes:- C:\projects\users\artifact\data\V1\swagger.json
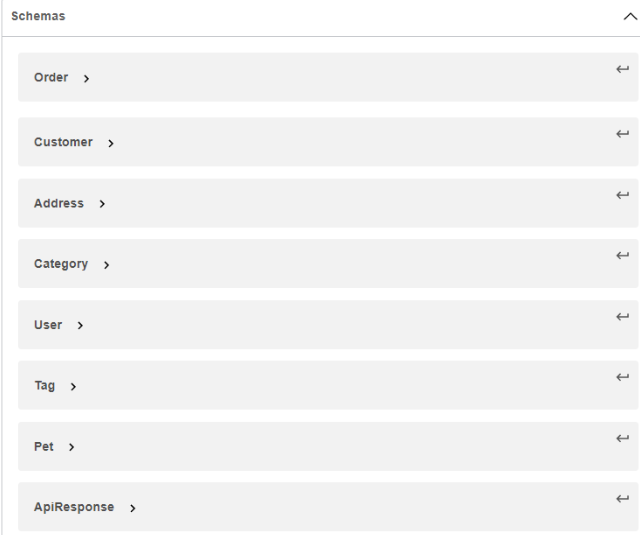
In the above example, you can see that there are various schemas declared like
User, Pet, Tag,
etc.
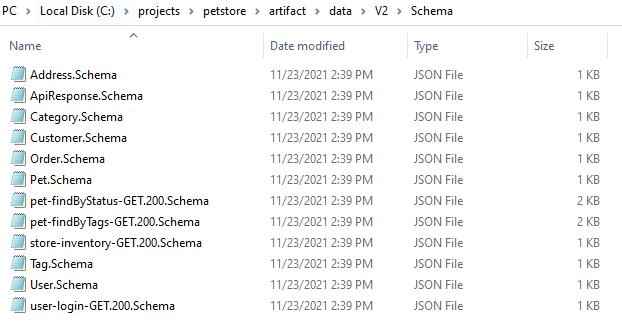
The nexial-swagger command generates Schema files inside the {Nexial Project
Directory}/artifact/data/{prefix}/Schema.The following is an example that demonstrates the generation of the Schema files.
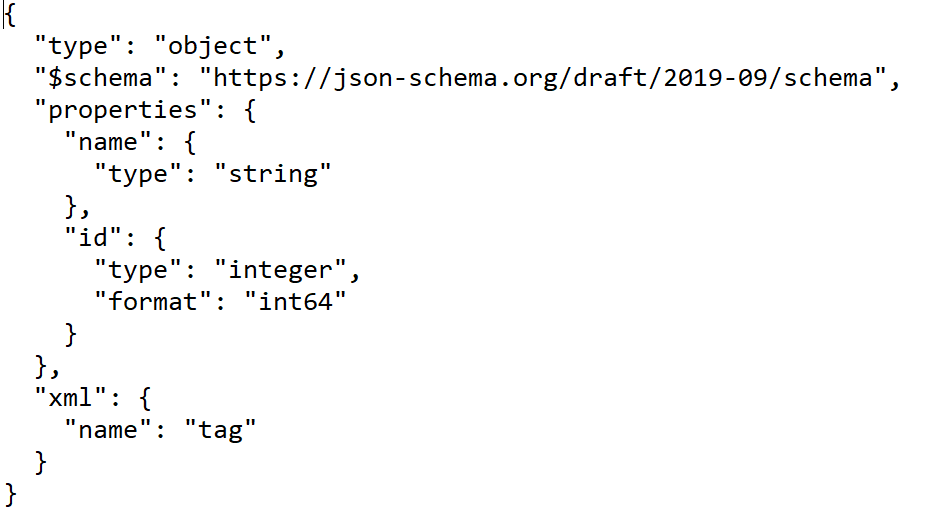
The Schema file contains the JSON Schema. The following is an example of Schema file content.
POST, PUT etc. need JSON body to be passed as part of the request.
This JSON body can be configured inside the payload files which are created under {Nexial Project
Directory}/artifact/data/{prefix}/payload. The payload file has all the values set
to default values i.e. "" for string, 0 for numeric, false for boolean, [] for arrays etc.
The following is an example of Request Body Template:-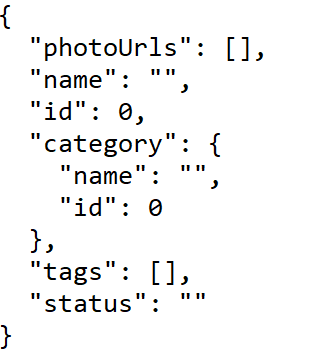
bin directory inside the artifact folder.
This bin directory will contain the following two files- run-{prefix}.cmd
- run-{prefix}.sh
These files act as an executable to run the script. The
.cmd file is used on the
Windows machine while the systems with other Operating Systems can use the .sh file.The following is an example of batch files.

- application/json
- application/octet-stream
Consider the following example where the method's request body is not having the supported Content-Types.
In such a case, the activities will be created with the
cmd type of step and the
command observe. The following is an example:-
However, the
nexial-swagger command doesn't support OAuth and OpenId Connect Discovery. In such
a case the scenario will create a new activity by the name Warning which contains a step,
that has the cmd type of step and the command observe.
The following is an example:-
Available Commands
assertReturnCode(var,returnCode)clearHeaders(headers)delete(url,body,var)download(url,queryString,saveTo)get(url,queryString,var)graphql(url,body,var)head(url,var)header(name,value)headerByVar(name,var)jwtParse(var,token,key)jwtSignHS256(var,payload,key)oauth(var,url,auth)oauthProfile(var,profile)patch(url,body,var)post(url,body,var)put(url,body,var)saveResponsePayload(var,file,append)soap(action,url,payload,var)upload(url,body,fileParams,var)