Understanding Project Structure
Nexial is designed to work with a variety of directory/file structures. One can specify target script or data file
locations when running nexial.[cmd|sh]. However it is recommended to follow
the standard Nexial automation project structure so that:
- Test artifacts are well-organized to reduce conflicts and to improve artifact management,
- Your project can integrate more easily with other project(s) (think Integration Testing) that follow the same structure,
- Automation is simplified since Nexial would derive most of the path-related work for you via the same common convention.
Below is the general directory/file structure of a standard Nexial automation project:
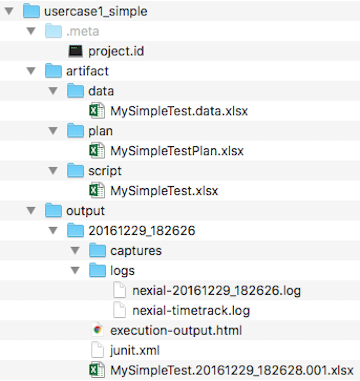
.meta/project.id
Strictly, this is not a required file. It helps to keep all instances of the same project on using the same name,
and thus easier to manage across participants and teams. Let’s further understand the underlying problem via an
example. Suppose John checks out ProjectA from the source code repository (say, GIT) to a local directory,
C:\projects\ProjectA but Sam checks out the same project to a local directory C:\projects\MyProject. In addition,
Amy checks out a different project locally, also as C:\projects\MyProject.
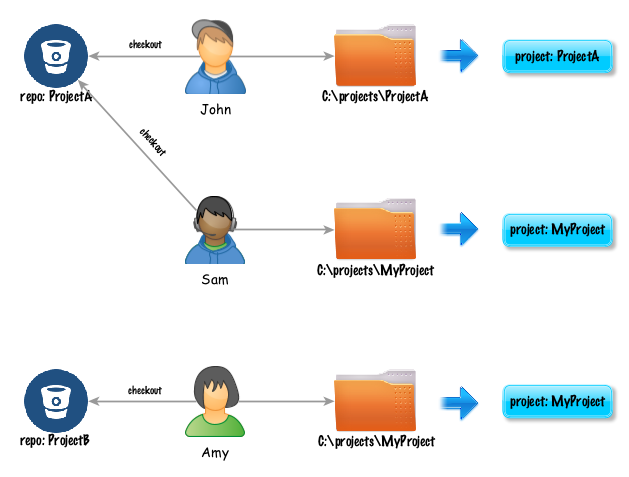
By default, Nexial derives the project ID based on the directory name. So as shown above, in John’s case, the project
name would be ProjectA while both Sam’s and Amy’s would be MyProject. Whilst John and Sam are working on the
same project and Amy on a different one, it would appear as if Sam and Amy are on the same project and John on
another one. Such inconsistency can be further exasperated when one attempts to integrate these projects into a
large test.
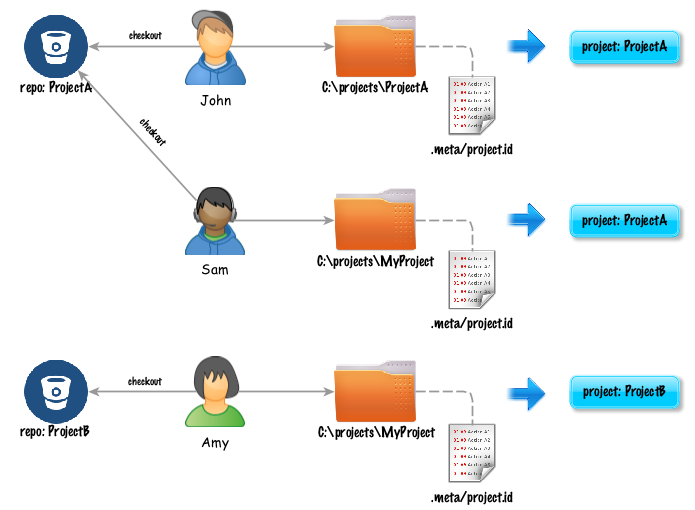
To eliminate such issue, Nexial employs the concept of “metadata” so that all instances of the same project will be
regarded as the same in terms of project identification. Contained in this .meta/project.id is such project
identification. Instead of deriving project ID based on the corresponding directory name, Nexial can identify the
same via the .meta/project.id file - which is committed to the corresponding source code repository and
subsequently checked out by project participants.
To generate such file, one can create it manually, or use the nexial-project.[sh|cmd]
batch file. A a team, changes to this .meta/project.id file can be driven through consensus and propagated
through source code repository (such as GIT).
When this project.id file is available, Nexial uses it to affix the output location when
nexial.outputToCloud is enabled. As such we can keep the output of the
same project in the same cloud storage location. Future effort will use this same project.id for further
enhancements such as execution output analysis, tracking and comparison.
The artifact/ directory
The artifact directory contains 3 sub-directories: data, plan, script. These are the directories are used
to store test data, test plan and test scripts respectively.
artifact/bin/
The artifact/bin directory contains custom batch files to execute a specific script or plan within the same
project. This directory is not required, but more of a recommendation. Using a batch file to execute your
script (or plan) helps to maintain consistency and simplify execution. This also helps to streamline the
integration effort with CI/CD tools like Jenkins.
artifact/script/
This directory will store your test scripts. The script files may be named to your likings. Generally the file name would reflect the overall functionality targeted for automation. Note that this is different than the naming recommendation for the worksheets within each test script. Each worksheet should reflect a test scenario, such as “User Login”, “Search for Best Deal”, “Import Client Data” and “Complete Order”. The test script would a collection of related scenarios and thus be named like “Guest Access to AppX”, “User Registration”, and “Monthly Client Data Import”.
Each sheet (test scenario) two sections: header (description of a test scenario) and body (test steps to automate). For
better understanding about scenario and test steps of test scripts, script developer can provide information in
description section of respective sections, as such test object and user acceptance criteria.
It is recommended that the macro files are stored in this location as well.
artifact/data/
The artifact/data directory stores your test data. By default, the data file is expected to be named in
correspondent to the test script: <TEST SCRIPT NAME>.data.xlsx. But this convention can be overridden during
execution via the -data flag to nexial.[cmd|sh] script. Similar to test scripts, each
data file would contain one or many data sheets (worksheets) that correspond to the test scenarios. Again, this
is the convention. Deviating from this convention can be attained via the -datasheet flag in
nexial.[cmd|sh]. In general, other data files such as SQL, JSON, test data files (text)
are stored in this location as well.
artifact/plan/
The artifact/plan directory will store all the test plan. Each test plan may contain one or more test scripts
and data files. It may contain test scripts and data files from a different project as well. For test artifacts
of the same project, and the standard convention is followed, they can be referenced simply by the file name. In
other words, test scripts are assumed to be found in artifact/script directory and data files are assumed to be
found in artifact/data directory. One may use relative path, such as
../../AnotherProject/artifact/script/AnotherScript.xlsx, to reference test artifacts of another project.
artifact/project.properties
The artifact/project.properties file (not shown above) is a “reserved” file designated to maintain project-wide
data and configuration. With any automation project, there are various “scopes” of data. Some data is meant for a
specific scenario - such should be stored within the datasheet (worksheet in data file) named after that scenario.
Some data is meant to be used through an entire test script - such should be stored in the #default datasheet
of the corresponding data file. Some data, however, is reusable across the entire project. Information such as
database connectivity, application URL, commonly used locators, etc. can be stored in one place. This improves
reuse and maintainability. This is the purpose of the artifact/project.properties.
Here are the rules about the artifact/project.properties:
- It must be found under the project directory as
artifact/project.properties. - It is expected to be a file that contains the standard name-value pairs, as in
name1=value1. Each pair is separated by newline. - It may contain custom data variables as well as Nexial system variables.
- Data variables defined in
project.propertieswill override the same defined in a data file.
Let’s have a look at project.properties file:
# You are reading the ".properties" entry.
! The exclamation mark can also mark text as comments.

# The key characters =, and : should be written with a preceding backslash to ensure that
# they are properly loaded.
# However, there is no need to precede the value characters =, and : by a backslash.
key1 = value1
key2=Value2

# Backslash below tells the application to continue reading the value from the next line.
message = Welcome to \
          Nexial!

# Add spaces to the key
key=with spaces = This is the value that could be looked up with the key "key with spaces".

# If you want your property to include a backslash, escaped it by another backslash
path=c:\\wiki\\templates
For more information on properties file, refer to Properties file format.
Environment-specific project.properties
As of Release v3.6, Nexial supports the concept of loading environment-specific
project.properties files. Inspired by the ever-popular Spring Framework, Nexial allows user to “stack” 2 distinct
project.properties files via the runtime-defined data variable nexial.env. This would enable Nexial to first load
the data variables found in project.properties, and then load (and possibly override) the data variables found in
the environment-specific project.properties file, such as project.QA.properties. One can use the
JAVA_OPT=-Dnexial.env=... or -override nexial.env=... technique on command line to specific a different
project.properties via the following naming convention:
project.${nexial.env}.properties
For example,
(on Windows, using JAVA_OPT=-Dnexial.env=... technique):
cd %NEXIAL_HOME%\bin

set JAVA_OPT=-D... -Dnexial.env=QA ...

nexial.cmd -script %PROJECT_HOME%\artifact\script\... ...
The above instructs Nexial to load artifact/project.properties and then load artifact/project.QA.properties.
(or Mac/*NIX, using -override technique):
cd $PROJECT_HOME/bin

nexial.sh -script $PROJECT_HOME/artifact/script/... ... -override nexial.env=STAGING
The above instructs Nexial to load artifact/project.properties and then artifact/project.STAGING.properties.
Note that if the specified nexial.env cannot resolve to a readable file, Nexial will fall back to the default
project.properties instead.
Using this nexial.env System variable, one can apply an
effective strategy towards data management where environment-specific data
variables can be separately managed while common, project-wide data variables remain centrally organized.
output/
The output directory contains the output of each test execution named as a run id, which is simply the timestamp
of the start of an execution. The captures subdirectory stores all the screenshots and capture videos (if any). The
logs directory stores all the log files, with the main log file named as nexial-[START DATE/TIME].log. The
execution output file is named similarly to the corresponding test script:
[TEST SCRIPT NAME].[START DATE/TIME].[ITERATION].xlsx. It is generally a good idea to keep output separated by
its execution. Hence the timestamp-based approach allows each execution its dedicated output directory. One can
consider using the same output location to store any output files generated as part of the execution. See
$(syspath|out|...) for more details.
When nexial.outputToCloud to set to true, the generated output will be
uploaded to designated cloud location and removed from local output directory.
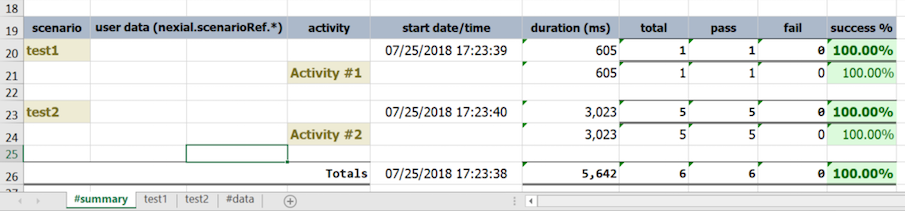
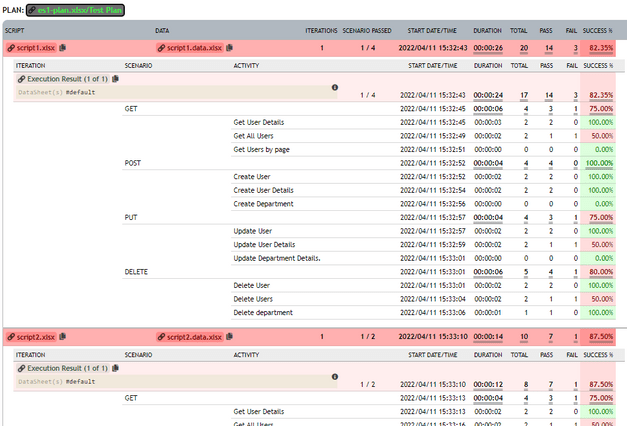
- The generated output file comes with a
#summarysheet, wherein the execution summary for that iteration is shown. Along with summary information, additional execution details are also available:run from: the host from which this execution was conducted.run user: the user of the operating system that performed the execution.java version: the version of Java (JRE or JDK) used for this execution.nexial version: the version of Nexial used for this execution.Data File: the data file (file name only) used for this execution.DataSheet(s): the data sheets from which test data was retrieved during execution.runtime args: the command line argument used in this execution. Typically, this describes the information entered afternexial.cmdornexial.sh.JAVA_OPT: additional runtime System properties (i.e.-D...) configured for this execution. Here’s a sample output file to illustrate the same:
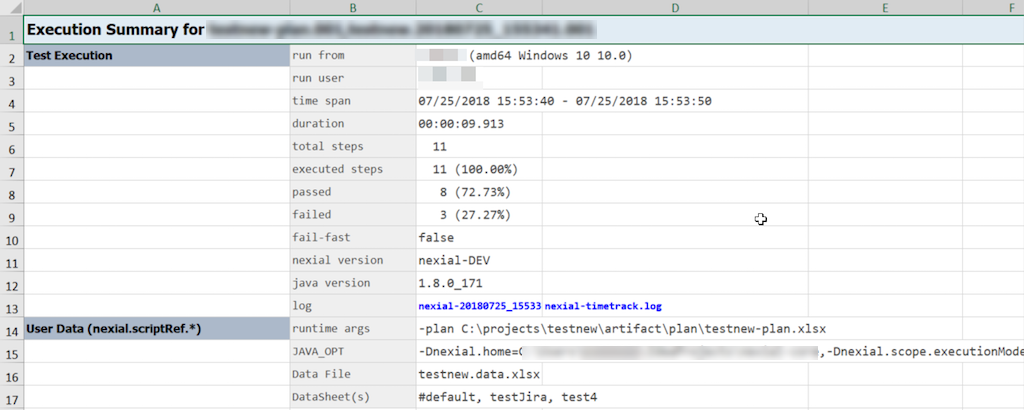 Additional entries, such as AUT version, test cycle, can be added here via the
nexial.scriptRef.*data variables.
- The
#summarysheet also includes with consolidated test summary, such as duration per activity and total steps passed and failed.
- Nexial supports data variable substitution in the description section of each test scenario to contextualize
information particular to the execution conducted. This will help its readers to differentiate the different
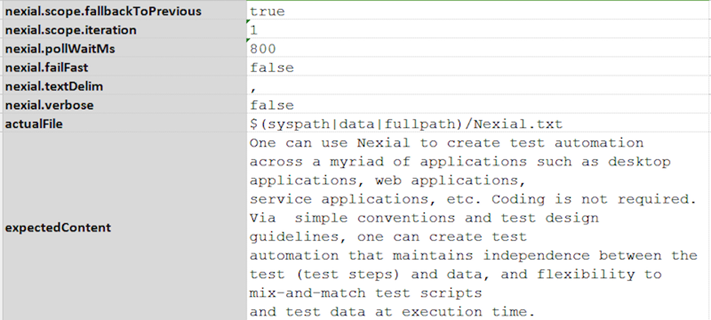
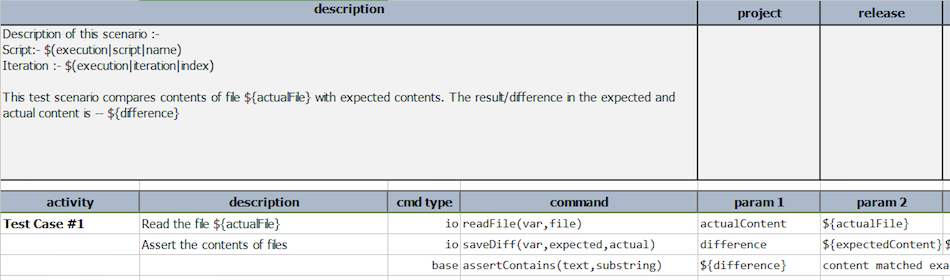
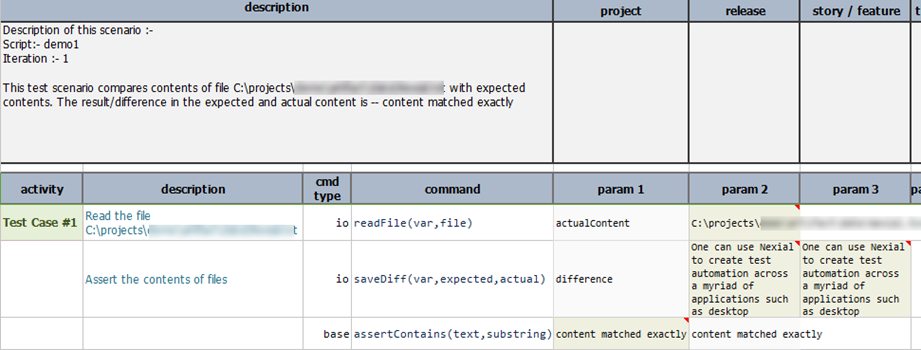
output for the same script. For example, suppose we have the following data file and test script:
Data File:
Test Script/Scenario:
Output File:
- Nexial also produces an HTML output at the end of execution to provide summary-level execution report, interactive
graph and result extrapolation across test plans, test scripts, iterations, scenarios, and activities:
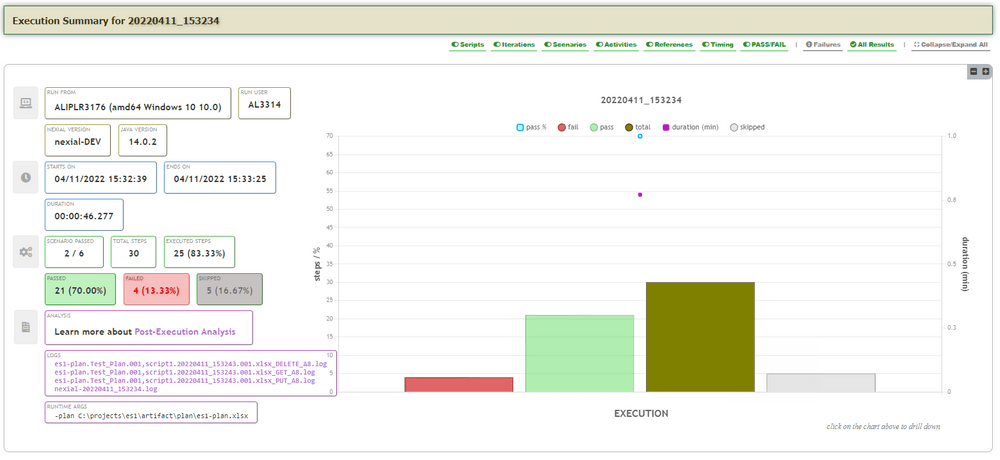
This interactive graph displays various execution data points, which can change to reflect different level of the execution data:- Number of steps that failed
- Number of steps that passed
- Number of steps skipped
- Total number of steps (as designed)
- Pass percentage (of all executed steps)
- Duration, in minutes, to execute the steps included in a specific execution level
The graph displays the execution result initially at the level of the overall execution:
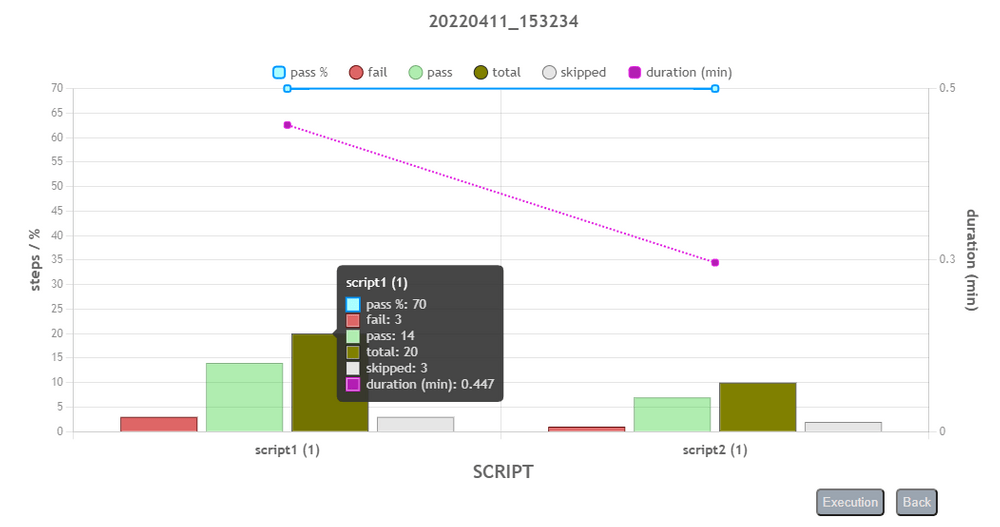
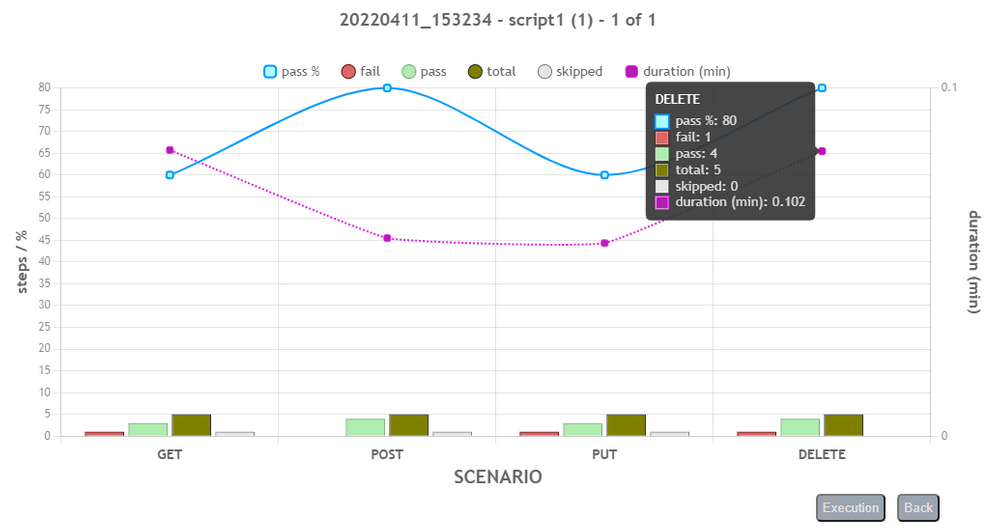
One can drill down to the next level of execution detail by clicking on the corresponding bar in the chart. The top-down levels of execution detail are: Execution > Script > Iteration > Scenario > Activity. Below are the examples of each of these levels:

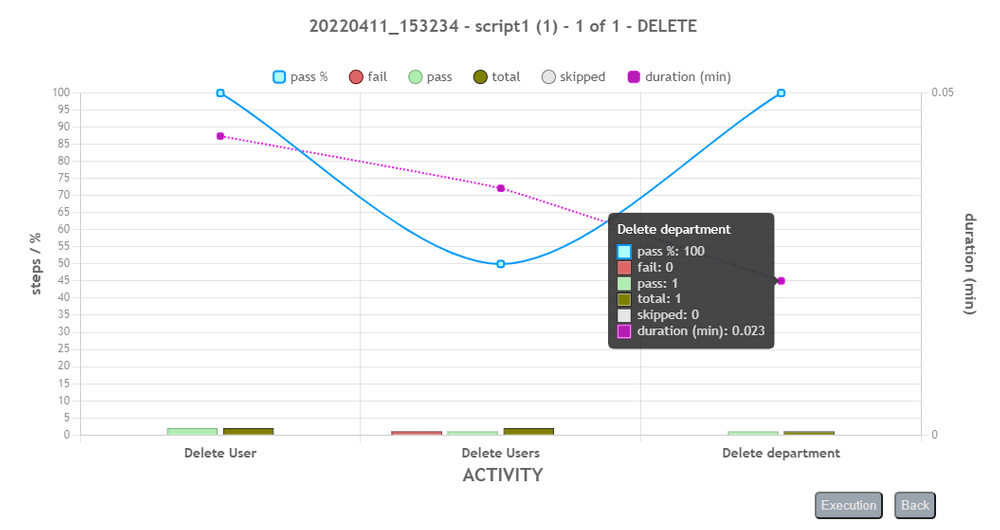
User can use the back button to return to previous level, or click on the Execution button to return to the Execution (top) level.
-
As of Nexial v4.3, this execution summary report also generate video playback for any generated desktop recordings and web service logs. For example, below is a snippet of the screen recording generated during execution. One may use the recording for further post-execution analysis.

Below shows an interactive grid for all the web service calls invoked during an execution. One can sort and filter this grid to better understand the performance and characteristics of the target application in terms of API calls. Note that
nexial.ws.logSummaryandnexial.ws.logDetailmust be turned on (set totrue) in order for this to work: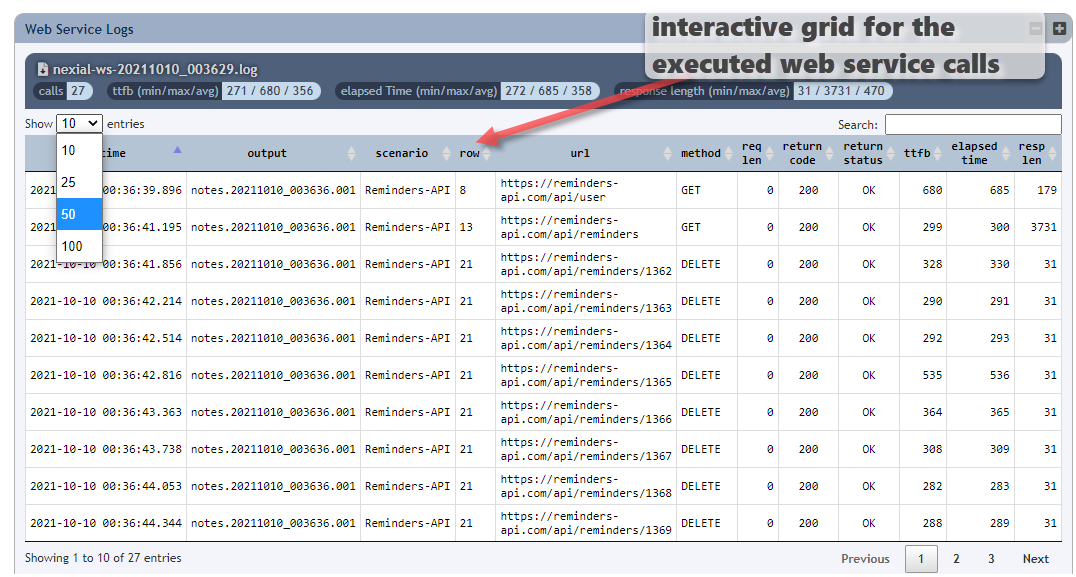
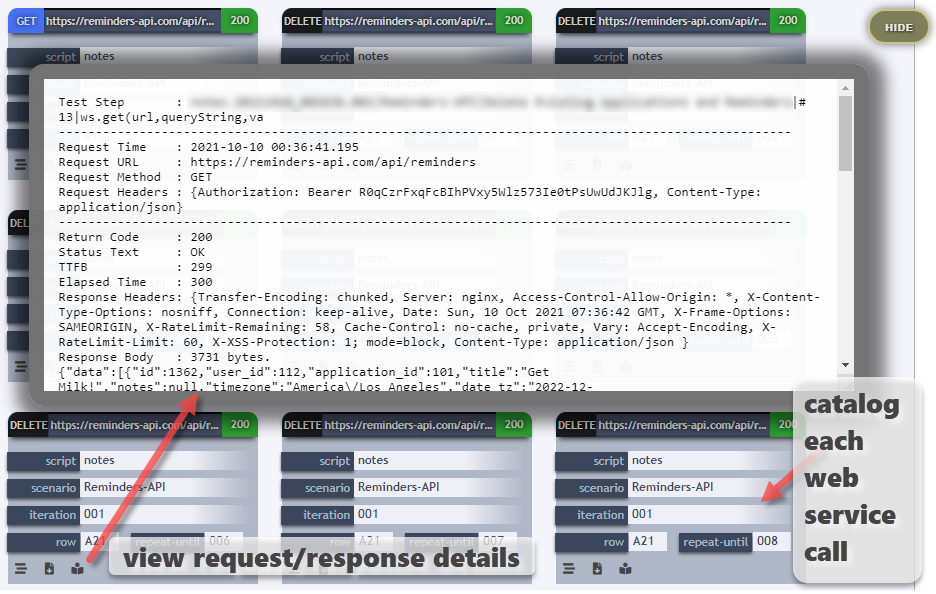
Besides the interactive web service summary grid, Nexial also catalog all the web service calls (see below) so that one can differentiate them and view the request/response detail of each invocation.
The Execution Summary file is always generated in the output directory as
execution-output.html. It provides summary data at multiple levels and links to the execution output file. Some amount of interactivity is available where one can toggle the visibility of script, iteration, scenarios and activities data. See Improving your execution summary report for more details. -
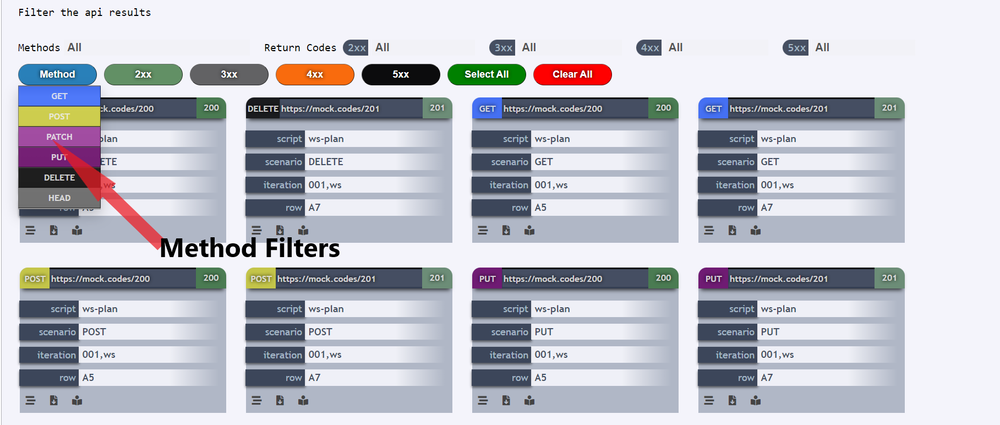
WebAPI Filters
Next to the section Web Service/API there is a feature to filter the API tiles based on the API Methods and Return codes, these are called as WebAPI filters. Below shows the interactive filters where one can filter the API tiles based on the criteria.
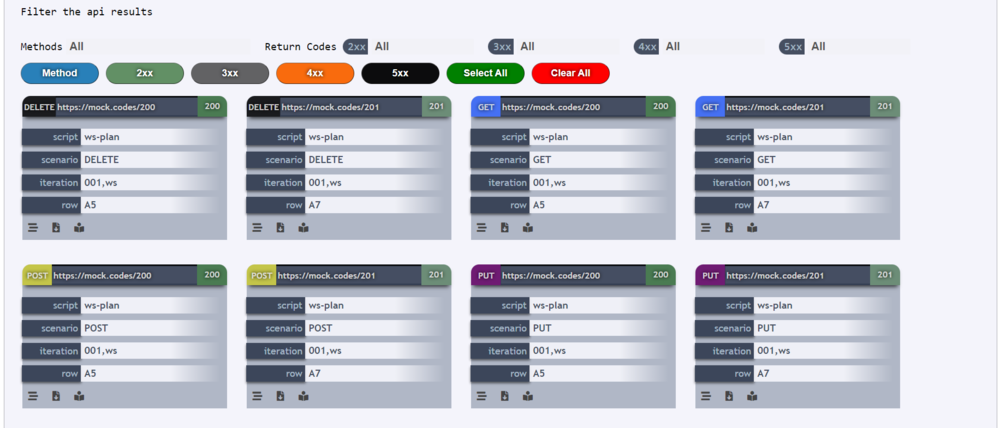
There are two ways to filter the API tiles, below given is filtering by method, where one can select the method(s) from the list of dropdown on hovering the Method button.
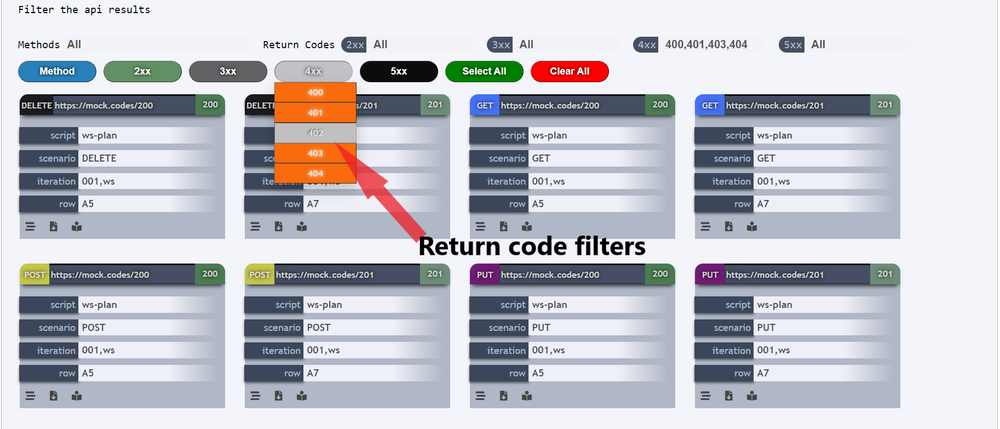
Similarly one can also filter by using the Return codes, the return codes are subdivided based on their Http Status codes. Below given is an example where one can filter the return code 402. User can hover the group button 4xx where he/she can find the return code 402. On clicking it he/she can select / deselect the option.
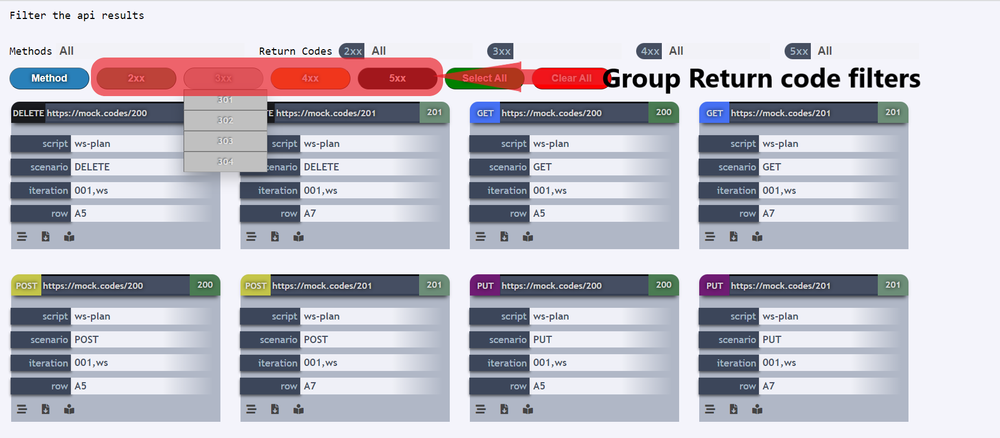
If one needs to Select / Deselect a group of return codes, user can click on the button with suffix “xx” to Select / Deselect the particular group of return codes, for instance if one needs to Select / Deselect the group “4xx” then he/she should click on the particular group button 4xx as shown in the below image.
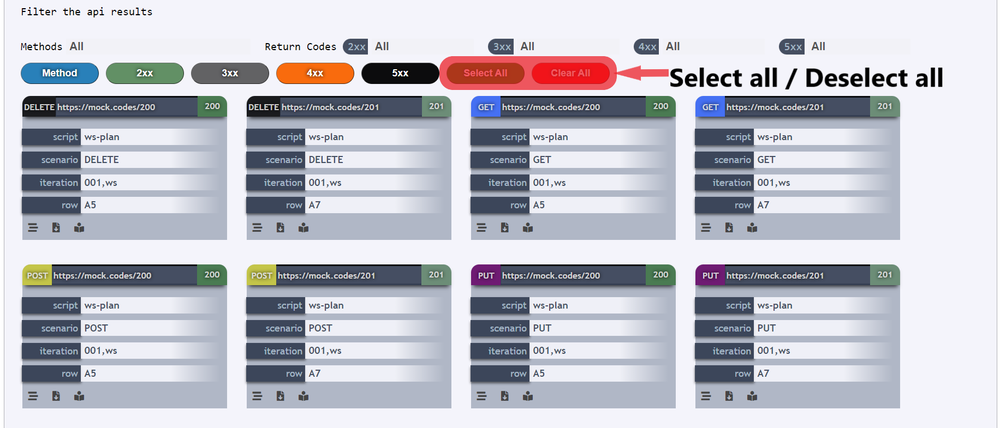
Users can also Select all or Delselect all filters by using these below given buttons.
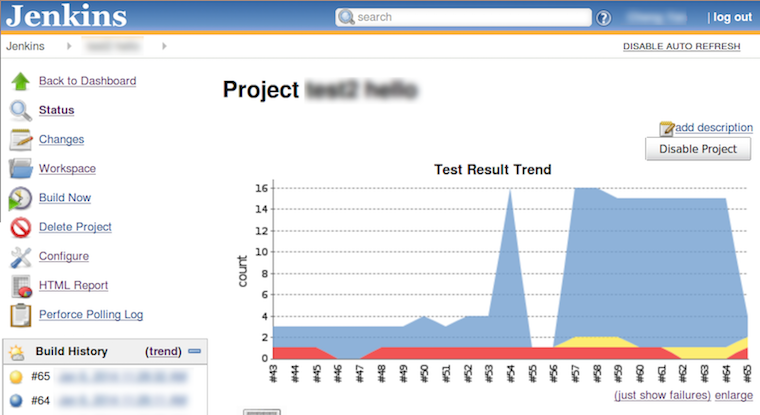
- Along with the above-stated output, Nexial also produces a JUNIT compatible xml file. This
XML file is always generated in the output directory as
junit.xml. This file is useful when integrating with JUNIT-compatible tools and plugins such as:

Additional Notes
For convenience, use the bin/nexial-project.cmd or bin/nexial-project.sh to generate the project structure for
you. See nexial-project.[cmd|sh] for more details.
As a convention, it is recommended to use C:\projects or /Users/<username/projects (MacOSX/Linux) as the top-level
directory for all your Nexial projects.
For more information, check out Understanding Nexial Test Artifact.
Adding new test artifact
Nexial is distributed with a set of empty, ready-to-use templates for your automation. Navigate to
${NEXIAL_HOME}/template directory, and you should see the available templates:
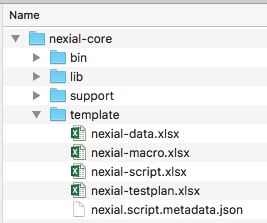
This template directory contains a few files – templates to get you starting a new test automation effort. Let’s have a closer look:
The template/ directory contains 4 files:
- nexial-data.xlsx: contains formatting rules to help differentiate between Nexial-specific data element and application-specific / custom data element. Technically one wouldn’t need this template per se. But it is recommended to use this template for your new data file for consistency’s sake.
- nexial-macro.xlsx: contains the basic template of a Nexial macro script (reusable steps). See
base »
macro(file,sheet,name)for more details about macros. - nexial-script.xlsx: the basic template of a test script.
- nexial-testplan.xlsx: the basic template of a test plan.
Generally speaking, it is recommended to use the nexial-project batch file to add new
artifact. This batch file provides a number of fail-safe automation that keep your project more manageable. However,
if you prefer, you may copy any of these “template” artifacts into your project. If you copy one of these templates to
your project directory, remember to (1) place it in the designated location (script/ for scripts, data/ for data,
etc.), and (2) rename according to convention.
Lastly, the templates are shipped with each build. They contain the latest set of commands available in each build.