web
Nexial supports browser automation via the popular Selenium/ WebDriver automation framework. In effect, Nexial translates the commands in the Nexial script (spreadsheet) to Selenium- or WebDriver- specific API calls, along with other automation work such as error handling and browser lifecycle management. Similar to web cookie and JavaScript alert automation, Nexial acts as the translator to mediate between the automation script and the underlying Selenium/WebDriver framework. As part of the overall approach to building an automation platform, the Nexial development team tries to keep up the latest official releases of its third-party libraries. Selenium is no exception. As of July 2018 Nexial uses Selenium 3.1.13 and the latest releases of related webdrivers.
Locators
For effective automation of Web application, there are several critical technical knowledge and techniques to apply. The most important of which is the right technique of writing locators. Locators are a collections of ways (7 in total) to identify elements of a web page. It is by such mechanism one can effectively identify elements on a web page, interact with them and perform automation upon them.
Note: Most of the information on the Web about locators are not created from the standpoint of a codeless or hybrid framework like Nexial. This applies to the links in this page. Reader’s discretion is advised…
Here’s a summary of the various locators (click on tab to view):
| Syntax/Example | Pros | Cons |
|---|---|---|
|
id=id-of-target-element
id=username
id=section1 |
|
|
|
This strategy instructs Nexial (webdriver behind the scene) to look for an element in the
current page
with an Typically the ID of a web element is assigned by the web developer. At the discretion of the developer, not every element might be assigned an ID, much less meaningful ones. Hence the success of using this approach is largely dependent on the developer, and to some extent the collaboration between engineers. Another issue is that, while ID should be unique on the same web page, many browsers allow violation of this rule such that an ID-based locator might match more than 1 element. Such anomaly occurs more frequently with generated ID stemmed from JavaScript front-end framework, the likes of React, Angular, Dojo, etc. In terms of performance, this approach is generally recognized as one of the faster ones. |
||
| Syntax/Example | Pros | Cons |
|---|---|---|
|
name=name-of-target-element
name=Password
name=SubmitOrder |
|
|
|
This strategy is similar to that of ID (above), with the exception that the target attribute
is
<form id="login_form" method="post" action="...">
     Enter username: <input type="text" name="username"/><br/>
     Enter password: <input type="password" name="password"/>
     <input type="submit" name="submit" value="Log In"/>
</form>
To access the textbox for username, one could use a locator as name=username.
To reference the "Log In" button, one could specify name=submit.
Due to how such attribute is used, this strategy is best suited to referencing form elements. Some forms are generated dynamically or programmed to behave differently based on user interaction. Such might be difficult for the name-based strategy.
By specification, the |
||
| Syntax/Example | Pros | Cons |
|---|---|---|
|
link=link-text or linkText=link-text
link=Click here
link=Sale of the Week linkText=Login |
|
|
|
This strategy is intended to select hyperlink element(s) (denoted via the <A> tag) which has exactly
the specified text. It's straightforward and relatively fast. It is most suitable for navigation testing
or "dead link" checks. For example, consider this website with its navigation links:
One would notice that the locators above are not listed in the order as shown on the web page. Since the
criteria herein is strictly based on (a) hyperlink element, (b) the text of such hyperlink, the order,
the location or hierarchy of these elements are important. This makes for an efficient navigation test.
Not all web applications use the <A> tag to represent its navigation (this is the recommended approach by all major search and SEO engines to improve search hits). If a web application opted to use another tag, such as <DIV> tag, then this locator strategy would not work. Lastly, some browsers treat line breaks in link text differently. Notably, older versions of IE would add extra spaces where the link breaks are found. The link-based locator assumes EXACT match on the link text. |
||

| Syntax/Example | Pros | Cons |
|---|---|---|
|
partialLinkText=partial-link-text or
partial=partial-link-text
partialLinkText=Forgot My
partial=Click here to |
|
|
|
This strategy is intended to select hyperlink element(s) (denoted via the <A> tag) that contains
the specified text. This strategy is similar to that of Link Text, except that only partial match on the
link text is required. As a convenience, Nexial supports both the use of This strategy has potentially some advantages and some disadvantages. On one hand, partial match would remove the need for exact match thus simplify the automation work a bit. However, partial match could result in erroneous automation. Partial match could result in multiple matches and an unintended link could be invoked as a result. As with most web commands, when there are multiple matches to the specified partial text match, only the first matched element is considered. Not all web applications use the <A> tag to represent its navigation (inasmuch as this is the recommended approach by all major search and SEO engines to improve search hits). If a web application opted to use another tag, such as <DIV> tag, then this locator strategy would not work. |
||
| Syntax/Example | Pros | Cons |
|---|---|---|
|
tag=tag-name-of-element
tag=select
tag=table |
|
|
|
This is another simple way to located element(s) on a web page. The idea is to filter to element(s) of the same "tag" so that interactions can be made to all the elements of the same tag. There is no hierarchy support so only 1 tag can be referenced at one time. This is designed for simplistic use cases where tags are not used by overlapping purposes. |
||
| Syntax/Example | Pros | Cons |
|---|---|---|
|
class=css_class_name
class=nav-item
class=required_input |
|
|
|
This type of locator matches elements with an attribute named as This type of locator focused on the style class(es) set to web element. While only 1 style class can be specified in the locator, it is capable of matching web element that contains multiple style classes (including the target class). For example, suppose the following HTML snippet: <li name="item1" class="style1">Item 1</li> <li name="item2" class="style1 style2">Item 2</li> <li name="item3" class="style1 style3">Item 3</li> <li name="item4" class="style1 style2">Item 4</li> <li name="item5" class="style1 style2 style3">Item 5</li>In this case,
This type of locator is simple, highly readable and easy to maintain. However, it only deals with one style class at a time and does not consider other HTML attributes. |
||
| Syntax/Example | Pros | Cons |
|---|---|---|
|
css=css-selector
css=form#login > input.username
css=input[name='login'][type='submit'] css=#records li:nth-of-type(4) css=a[id^='id_prefix_'] |
|
|
|
Unlike the ID locator, name locator, link text locator and style class locator, which are designed for more specific cases, the CSS locator is designed for general-purpose use. Using the appropriate CSS selector, one can pinpoint to the element or elements with precision. A CSS Selector is a combination of an element selector and a value which identifies the web element within a web page. They represent HTML tags, attributes, ID and Classes as patterns that match against elements in their respective hierarchical structure tree. The W3C CSS-Selector provides a wide range of capabilities to reference web elements, of which most are implemented in Selenium 3.x. In general, the CSS selectors can be divided into the following categories:
|
||
| Syntax/Example | Pros | Cons |
|---|---|---|
| xpath=xpath-to-target |
|
|
|
XPATH is a W3C standard to reference nodes and fragments of an XML/xHTML document. It has
sufficiently descriptive syntax for precise element referencing while not bound to the
underlying DOM structure. It is commonly known as an effective alternative where
However, with great power comes great responsibility.
XPath based locator can be easily misused where the locators can become difficult to read and maintain.
Deciphering and maintaining XPaths like
There are lots of tutorial and learning material on the Internet regarding XPath. Here are some that might be helpful:
|
||
| Syntax/Example | Pros | Cons | ||||||||||||||
|---|---|---|---|---|---|---|---|---|---|---|---|---|---|---|---|---|
|
text=element-text
text=Welcome
text=CONTAIN:order complete text=START_ANY_CASE:This request is submitted |
|
|
||||||||||||||
|
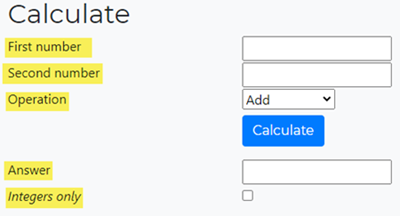
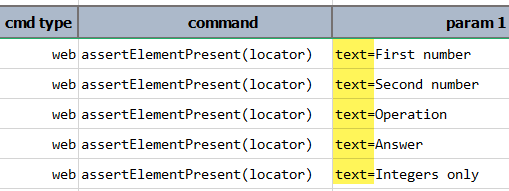
The "text" locator is uniquely crafted within Nexial to provide an efficient and easy-to-maintain
strategy for text-centric components. Consider the following example with multiple labels
(highlighted) and how we can reference them via
While its convenience is undeniable, this locator strategy is not a cure-all. Here are some reasons why you might not want to rely on this locator strategy too much:
In terms of performance, this approach is around the same speed as that of the XPATH-based locators. |
||||||||||||||||
| Syntax/Example | Pros | Cons | ||||
|---|---|---|---|---|---|---|
|
layer={locator}{locator}{...}
layer={css=dialog.toast}{text=Transaction Complete}
layer={css=.error}{text=CONTAIN:Invalid} |
|
|
||||
|
This is another Nexial-only locator. In essence, this approach allows the mix-and-match of any locator per
"DOM layer" to reference the target element(s). One can think of a "DOM layer" as the parent-child concept
of a web page, where web element capable of containing one or more web (child) elements. At each hierarchy
(or layer), a web element can be constructed very differently than its parent or its children
elements. As such, there might not be an optimal locator to reference a specific element and its parent
elements. Suppose we want to reference the <nav class="navbar navbar-light bg-light"> <i class="fa fa-shopping-cart fa-lg m-2" aria-hidden="true"></i> <span class="badge badge-pill badge-info m-2" style="width: 50px;">1</span> <span>Items</span> </nav>XPATH would seem to be the obvious choice since it is the only locator that can reference element text. However, XPATH isn't ideal to reference CSS classes. With layer locator we can reference the
same web element. Consider the difference between these locators:
layer locator (right) reads
find a web element that contains a "navbar" CSS class, then under such element, find a child or descendent element that has text "Item".In this case, the end result is the same as that of the XPATH locator. However, the layer locator has this {...} syntax, which represents 1 layer, that allows us to use different locator at each layer.
We can select the best locator strategy - in terms of performance, maintainability, etc. - at every layer
to create a so-called compound locator. This can lead to productivity gain, performance gain, and improved
readability.
Consider a different example below, 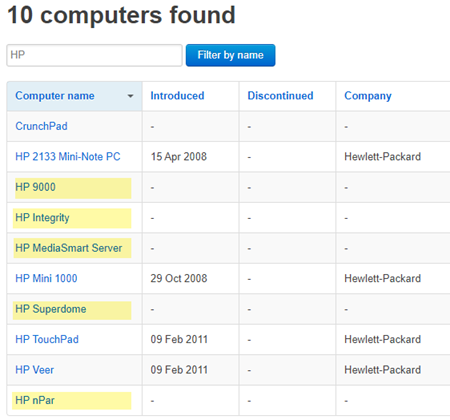 Suppose the objective is to find all the computer names that
layer={css=.computers}{.//tr[td[2][text()='-']]}{text=START:HP}
Note that the second layer uses a relative XPATH (a dot in front) because we are filtering within the previous "layer" (the TABLE). The last layer will automatically be converted into a
relative locator by Nexial. The START: syntax is part of PolyMatcher. Check out the "Text"
locator tab for more details on this.Now we can put this layer locator to good use: 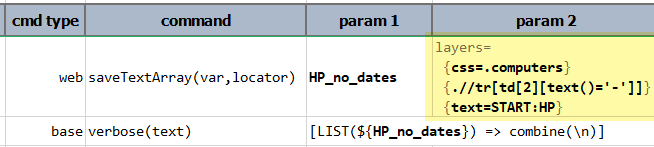 Using the web » saveTextArray(var,locator)
command we can capture the text of each referenced web element. Then using the
LIST expression, we can convert the captured list into a
newline-separated text, like this: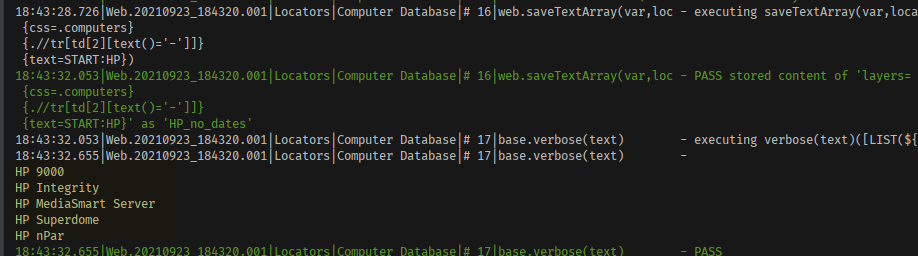
One critical thing to note is that the flexibility of the layer locator can easily lead to abuse. One
should still hold to all the good practices of writing effective locators. |
||||||
Additional Help on Locators
Here are a few tutorials on locators (please feel free to send more links so we can add to this list):
- seleniumeasy - Locators for Selenium
- e-gineering - Simplify Selenium Selectors
- 16 Ways to Search, Find and Edit with Chrome DevTools
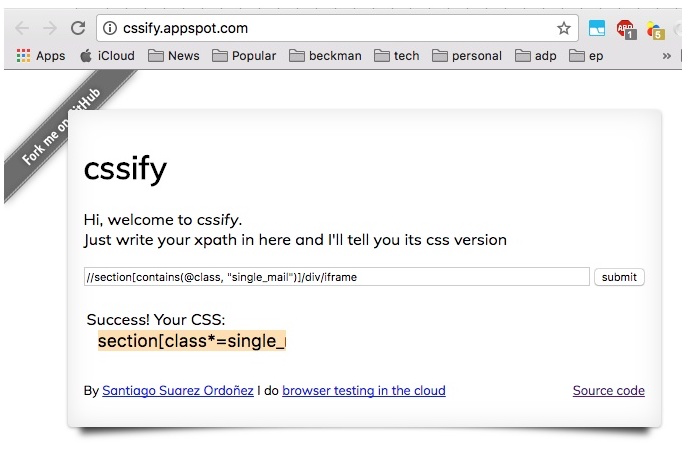
One might consider converting XPaths to CSS locators since CSS locators are generally faster and more readable. Here’s
an online app to help converting XPath to CSS locator:
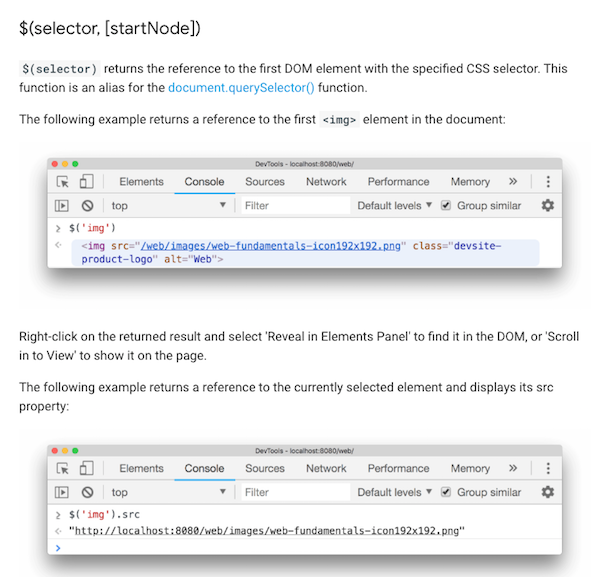
Google Chrome comes with a sleuth of useful features to perform common tasks such as selecting and inspecting DOM
elements, and monitoring DOM events. This is available from the Chrome DevTools (aka Console):
Browser Support
Nexial currently supports the following browsers (recent versions only):
- Firefox
- Firefox Headless
- Chrome
- Chrome Headless
- Chrome in Embedded Mode
- Electron
- Safari
- Safari Technology Preview
- Internet Explorer 9 and above
- Microsoft Edge
- Microsoft Edge Chromium
- BrowserStack
- CrossBrowserTester
- Make sure a recent version of
Firefox
suitable to your platform is installed locally. For Linux and Mac OS,
firefoxorfirefox-binis expected to be found in the$PATHenvironment variable. The order of paths in$PATHdetermines the precedence in being selected as the target executable for automation. For Windows, Firefox is expected to be installed in either%ProgramFiles%\Mozilla Firefoxor%ProgramFiles(x86)%\Mozilla Firefox. - Set
nexial.browsertofirefox. - Begin scripting...
- Make sure a recent version of
Chrome suitable to
your platform is installed locally. Linux installation differs based on distro - check distribution vendor
website or Google for more details. Be sure that
google-chromecan be found in$PATHenvironment variable. For Mac,Google Chromeis expected to be installed either in the standard/Applications/Google Chrome.appor in the home directory of the current user (give precedence). - Set
nexial.browsertochrome. - Begin scripting...
It is possible to emulate mobile devices during automation via the Chrome webdriver (i.e.
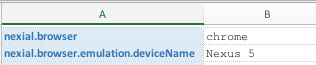
nexial.browser as chrome).There are 2 ways of enabling mobile device emulation:
- via the
nexial.browser.emulation.deviceNamedata variable - via the
nexial.browser.emulation.userAgentdata variable.
The second approach offers finer controls. Along with the "User Agent" string to match the target mobile device, one can also specify the width (via
nexial.browser.emulation.width data variable), the height
(nexial.browser.emulation.height data variable), the pixel ratio (via the
nexial.browser.emulation.pixelRatio data variable) and touch activation (via the
nexial.browser.emulation.touch data variable). For example,
Note that
nexial.browser.emulation.pixelRatio defaults to 3.0 and
nexial.browser.emulation.touch defaults to true.For a list of supported mobile devices and their respective "user-agent" string, visit the following link: Chrome's Emulated Devices JSON
For more information about mobile device emulation, visit ChromeDriver's Mobile Emulation page. While it is cost-effective to use the emulation capability of ChromeDriver, it is noteworthy that there are known issues and limitations of using ChromeDriver's mobile emulation.
Note that uring device emulation, the screen capturing might cause a sudden "grow-and-shrink" behavior as shown below:
Emulators cannot accurately reflect the real devices in terms of hardware and OS-specific nuances. For more accurate testing, consider using BrowserStack or CrossBrowserTesting services (both commercial) instead.
To enable CEF automation, follow these steps:
- Make sure the Chrome-embedded application (AUT) is properly installed. In most cases, one should find a
libcef.dllorlibcef.soin the same location as the CEF-enabled application. - Set
nexial.browsertochrome.embedded. - Set
nexial.browser.embedded.appLocationto the full path of the application executable program. - Begin scripting...
To enable Electron application automation, follow these steps:
- Make sure the target Electron application is properly installed.
- Set
nexial.browsertoelectron. - Set
nexial.browser.electron.appLocationto the full path of the executable program. For MacOS, the executable is usually found under$APPLICATION/Contents/MacOS/. - Begin scripting...
- Make sure a recent version of Safari is installed locally. Only MacOS is supported for safari automation at this time.
- Set
nexial.browsertosafari. - Begin scripting...
- Make sure a recent version of Safari Technology Preview is installed locally. Only MacOS is supported for Safari automation at this time.
- Set
nexial.browsertosafari. - Set
nexial.browser.safari.useTechPreviewtotrue. - Begin scripting...
- Make sure a recent version of Internet Explorer suitable to your platform is installed locally. Only Windows 7 and above is supported at this time.
- Set
nexial.browsertoie. - Be sure to read through and follow the recommendations listed in Web Automation On IE.
- Begin scripting...
- Make sure a recent version of Microsoft Edge Browser suitable to your platform is installed locally. Only Windows 10 is supported at this time.
- Set
nexial.browsertoedge. - Be sure to read through and follow the recommendations listed in Improving IE Automation (these recommendations apply to Edge as well!).
- Begin scripting...
- Make sure a recent version of Microsoft Edge Chromium Browser suitable to your platform is installed locally. Only Windows is supported at this time. To find out browser version locally, please go through How to check Edge version
- Set
nexial.browsertoedgechrome. - Be sure to read through and follow the recommendations listed in Improving IE Automation (these recommendations apply to Edge as well!).
- Begin scripting...
To enable BrowserStack integration, be sure to read up on the BrowserStack Integration page.
... Browser testing is a method of quality assurance for web applications across multiple browsers. ... It’s implemented to ensure a website’s functionality and design and includes testing a range of devices and operating systems being used in the market and customer base.CrossBrowserTesting is a popular cloud, web and mobile testing platform that enables developers to test their websites and mobile applications across on-demand browsers, operating systems, and real mobile devices. And, much like BrowserStack, this is also a paid service.
To enable CrossBrowserTesting integration, be sure to read up on the CrossBrowserTesting Integration page.
WebDriver Support
Nexial automatically downloads required webdriver, during runtime as needed. Webdrivers are downloaded to the user’s
home directory, under the .nexial folder. For example, C:\Users\MY_USER_ID\.nexial\chrome or
/Users/USERID/.nexial/firefox. Also, a .manifest file with the driver details is maintained in the same directory.
The .manifest file is used to check and download the latest version available based on the current OS. If there should
be any reason not to update to the newer/latest webdriver (e.g. due to compatibility with older browser), one can
disable the automatic webdriver update by setting "neverCheck": true in .manifest file.
See Forcefully update or omit webdriver updates for more details.
Browser Performance Metrics
As of v2.7, Nexial supports the collection of browser performance metrics during execution. One can configure an execution to collect browser performance metrics without the need to modify automation script. The collected metrics will be presented as a web page at the end of the execution. To read more about this, visit Browser Performance Metrics.
Browser Metadata
As of Nexial v2.9, Nexial exposes a set of metadata concerning the browser in execution. Such metadata provides further insight concerning the browser in used for automation, such as the browser version and if it is running in a desktop or mobile platform. This can be useful towards conditional execution and reporting.
To open a URL via Nexial, one would utilize one of the following commands:
- web »
open(url) - web »
openAndWait(url,waitMs) - web »
openHttpBasic(url,username,password) - web »
openIgnoreTimeout(url)
Within each of these commands, Nexial will ensure that the browser metadata is also captured and stored to a System
variable named nexial.browser.meta. This means that the browser metadata will not be available for use until one of
the above commands is invoked.
When the browser is closed via the web » closeAll() command or via
the web » close() command on the last window/tab, the same nexial.browser.meta System variable
will be removed. This allows one to utilize a different browser thereafter and for Nexial to capture the relevant
browser metadata accordingly.
One can inspect the browser metadata via the nexial.browser.meta System variable. The browser metadata has nested
structure to expose information about the browser, the underlying operation system and device classification. Below is
a graphical depiction of the metadata available during execution:
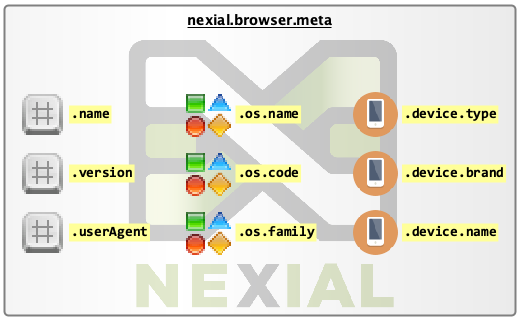
-
${nexial.browser.meta}.name- the name of the browser currently in execution. -
${nexial.browser.meta}.version- the full version string of the browser currently in execution. -
${nexial.browser.meta}.userAgent- the full identifier of the browser currently in execution. See User agent for more details. -
${nexial.browser.meta}.os.name- the (marketing) name of the underlying operation system. For example,iOS 8,macOS 10.14 Mojave,Windows 10. -
${nexial.browser.meta}.os.code- the code name of the underlying operation system. For example,ios_8,macos_10_14,windows_10. -
${nexial.browser.meta}.os.family- the product family of the underlying operation system. For example,Windows,iOS,macOS. -
${nexial.browser.meta}.device.type- the detected device type for the browser currently in execution. For example,desktop,table,smartphone. -
${nexial.browser.meta}.device.brand- the name of the device for the browser currently in execution. May be empty. For example,Apple. -
${nexial.browser.meta}.device.name- the name of the device for the browser currently in execution. May be empty. For example,Mac,iPad.
Note: Nexial uses Userstack for browser metadata detection.
The “web” command type represents a series of automation commands regarding web operations. See below for a list of available commands.
Available Commands
assertAndClick(locator,label)assertAttribute(locator,attrName,value)assertAttributeContain(locator,attrName,contains)assertAttributeNotContain(locator,attrName,contains)assertAttributeNotPresent(locator,attrName)assertAttributePresent(locator,attrName)assertChecked(locator)assertContainCount(locator,text,count)assertCssNotPresent(locator,property)assertCssPresent(locator,property,value)assertElementByAttributes(nameValues)assertElementByText(locator,text)assertElementCount(locator,count)assertElementDisabled(locator)assertElementEnabled(locator)assertElementNotPresent(locator,maxWaitMs)assertElementPresent(locator)assertElementsEnabled(prefix)assertElementsPresent(prefix)assertElementsPresent(prefix)assertFocus(locator)assertFrameCount(count)assertFramePresent(frameName)assertIECompatMode()assertIENavtiveMode()assertLinkByLabel(label)assertLocation(search)assertMultiSelect(locator)assertNotChecked(locator)assertNotFocus(locator)assertNotText(locator,text)assertNotVisible(locator)assertOneMatch(locator)assertScrollbarHNotPresent(locator)assertScrollbarHPresent(locator)assertScrollbarVNotPresent(locator)assertScrollbarVPresent(locator)assertSelectOptionsAbsent(locator,options)assertSelectOptionsPresent(locator,options)assertSingleSelect(locator)assertTable(locator,row,column,text)assertText(locator,text)assertTextContains(locator,text)assertTextCount(locator,text,count)assertTextList(locator,list,ignoreOrder)assertTextMatches(text,minMatch,scrollTo)assertTextNotPresent(text)assertTextOrder(locator,descending)assertTextPresent(text)assertTitle(text)assertValue(locator,value)assertValueOrder(locator,descending)assertVisible(locator)-
[(removed)checkAll(locator)] checkAll(locator,waitMs)clearLocalStorage()click(locator)clickAll(locator)clickAndWait(locator,waitMs)clickByLabel(label)clickByLabelAndWait(label,waitMs)clickIfPresent(locator)clickOffset(locator,x,y)clickWithKeys(locator,keys)close()closeAll()deselectMulti(locator,array)dismissInvalidCert()dismissInvalidCertPopup()doubleClick(locator)doubleClickAndWait(locator,waitMs)doubleClickByLabel(label)doubleClickByLabelAndWait(label,waitMs)dragAndDrop(fromLocator,toLocator)dragTo(fromLocator,xOffset,yOffset)editLocalStorage(key,value)executeScript(var,script)focus(locator)goBack()goBackAndWait()maximizeWindow()mouseOver(locator)moveTo(x,y)open(url)openAndWait(url,waitMs)openHttpBasic(url,username,password)openIgnoreTimeout(url)openInTab(name,url)refresh()refreshAndWait()resizeWindow(width,height)rightClick(locator)saveAllWindowIds(var)saveAllWindowNames(var)saveAttribute(var,locator,attrName)saveAttributeList(var,locator,attrName)saveBrowserVersion(var)saveCount(var,locator)saveCssValue(var,locator,property)saveDivsAsCsv(headers,rows,cells,nextPage,file)saveElement(var,locator)saveElements(var,locator)saveInfiniteDivsAsCsv(config,file)saveInfiniteTableAsCsv(config,file)saveLocalStorage(var,key)saveLocation(var)savePageAs(var,sessionIdName,url)savePageAsFile(sessionIdName,url,file)saveSelectedText(var,locator)saveSelectedValue(var,locator)saveTableAsCsv(locator,nextPageLocator,file)saveText(var,locator)saveTextArray(var,locator)saveTextSubstringAfter(var,locator,delim)saveTextSubstringBefore(var,locator,delim)saveTextSubstringBetween(var,locator,start,end)saveValue(var,locator)saveValues(var,locator)screenshot(file,locator,removeFixed)screenshotInFull(file,timeout,removeFixed)-
[(removed)scrollElement(locator,xOffset,yOffset)] -
[(removed)scrollLeft(locator,pixel)] scrollPage(xOffset,yOffset)-
[(removed)scrollRight(locator,pixel)] scrollTo(locator)select(locator,text)selectAllOptions(locator)selectDropdown(locator,optLocator,optText)selectFrame(locator)selectMulti(locator,array)selectMultiByValue(locator,array)-
[(removed)selectMultiOptions(locator)] selectText(locator)selectWindow(winId)selectWindowAndWait(winId,waitMs)selectWindowByIndex(index)selectWindowByIndexAndWait(index,waitMs)switchBrowser(profile,config)toggleSelections(locator)type(locator,value)typeKeys(locator,value)-
[(removed)uncheckAll(locator)] uncheckAll(locator,waitMs)unselectAllText()updateAttribute(locator,attrName,value)upload(fieldLocator,file)verifyContainText(locator,text)verifyText(locator,text)wait(waitMs)-
[(removed)waitForElementPresent(locator)] waitForElementPresent(locator,waitMs)waitForElementTextPresent(locator,text)waitForElementsPresent(locators)waitForPopUp(winId,waitMs)waitForTextPresent(text)waitForTitle(text)waitUntilDisabled(locator,waitMs)waitUntilEnabled(locator,waitMs)waitUntilHidden(locator,waitMs)waitUntilVisible(locator,waitMs)waitWhileElementNotPresent(locator,waitMs)